Blender 3D is a free software capable of creating amazing animations. Most animation in Blender uses what are known as keyframes. This introduction to keyframes in Blender will cover everything you need to start animating!
This page may contain affiliate links which pay me a commission if used to make a purchase. As an Amazon Associate, I earn from qualifying purchases.
What is a Keyframe?
Before computers, animators had to manually draw each and every frame of an animation – making extremely small changes between each image.
With keyframes in Blender (and other animation software) we tell the program how or where we want “something” to be at one point in time.
Then, we move to another point in time in our animation and tell Blender how the “something” should be there. Those two points in time are known as “keyframes.” Blender will calculate the animation for every frame between the two keyframes.
Why do I say “something?” That’s because animation keyframes can control a lot of things. They can control the location, shape and color of objects. Keyframes can control lighting conditions, fog, camera positioning and almost every other component of an animation.
Basic Keyframe Example
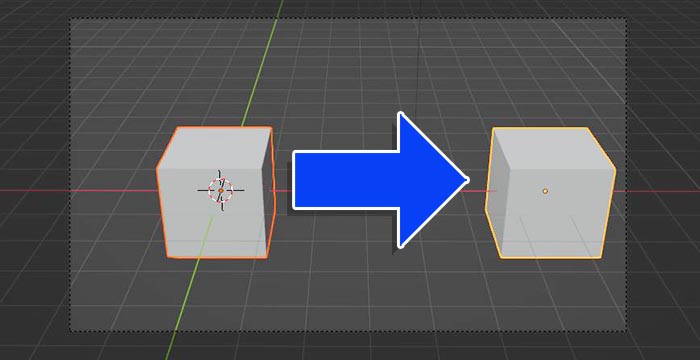
Here is the most basic example of keyframe animation. Let’s say we want the cube in the above image to move from the left side of the screen to the right. We need to decide at which frame in the animation, the cube will begin to move. Secondly, we need to identify the frame where the cube stops moving.
In this example, we will have the cube begin moving on frame 50 of our animation and stop moving on frame 100. We need to first go to frame 50 in the timeline. Ensure the cube is at the desired starting location and enter a keyframe (I’ll show you how in the next section).
Then we need to go to frame 100 in the animation, move the cube to its end location and enter another keyframe.
We’ve just told Blender we want the cube to start in one location on frame 50 and end in another location on frame 100. Blender will calculate where the cube will be on every single frame (ie: frame 51, 52, etc.).
Without keyframes, we would have to move the cube 50 times and render it in each location as it travels. There is of course much more to cover on keyframe animation.
The Timeline Editor
Before jumping into adding keyframes, let’s look at the timeline editor. In Blender’s default workspace, the timeline editor is at the bottom of the screen.
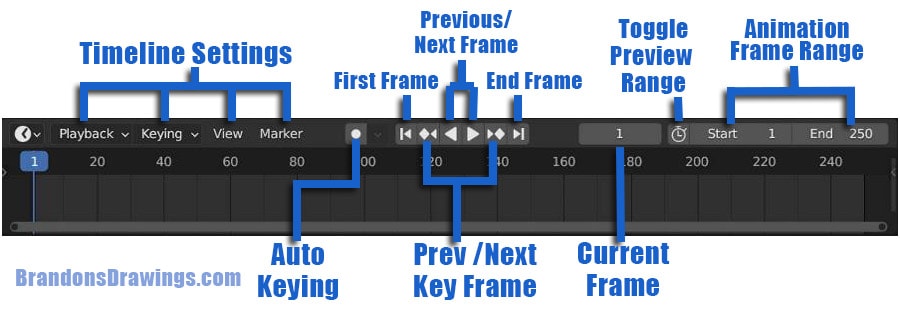
If you’ve ever used a video editing software, this will look familiar. The most important part is we understand how to move back and forth on the timeline and to recognize which frame we are currently on.
The current frame will appear in the “Current Frame” box and will be visually indicated by the vertical line with a highlighted number above it. In the above example, the timeline is on frame #1.
How to Add a Location Keyframe
Keyframes can be added to many things in Blender, but let’s stay with the simple example of moving a cube across the screen. Here’s how to add location keyframes to an object in Blender.
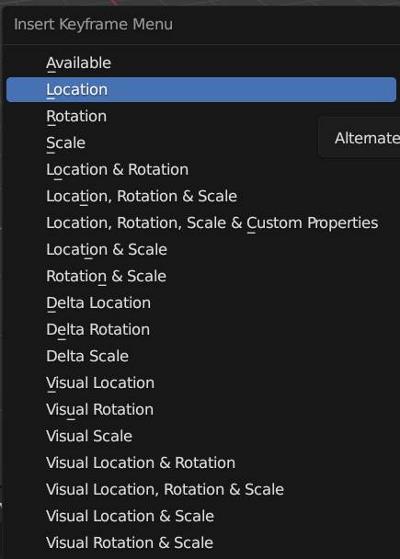
Following these instructions will add two keyframes to the object. One is where the object starts moving and one is where it stops.
In the timeline, two diamonds will appear indicating where the keyframes have been placed. The diamonds are yellow when selected and white when they are not selected.

We could of course add additional keyframes to continue animating the movement and Blender will calculate the location for each frame between keyframes.
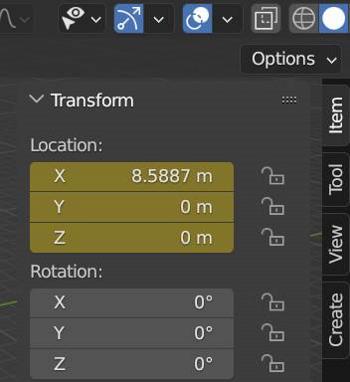
Transform Values in Sidebar
When we add keyframes to the location, rotation or scale of an object, we are actually keyframing the values of these transform properties.
In the Sidebar under “View” we will see colors appear on the keyframed values.
We will discuss what these colors mean a little farther down.
Reversing Direction
Let’s say we want the cube to stay in the final position for another 50 frames (until frame 150) and then go back to the left side of the screen by frame 200. We would need to go to frame 150 and without moving the cube, add another location keyframe.
The purpose of this keyframe is to tell Blender that no movement should occur between the last key frame and this one. When two adjacent keyframes display the same value, a line between them will appear in the timeline indicating there is no change.

Then we will go to frame 200, move the cube back to the left side and add a location keyframe.
The addition of the keyframe at frame 150 is easily overlooked, but is important. Without it, the cube would move to the right and then immediately begin moving back to the left.
Interpolation
The calculation of movement or other changes between two keyframes is called “Interpolation.” There are different methods for how animated characteristics can be interpolated (again, much more than just location can be animated.)
You may have noticed the cube started to move slowly, sped up and then slowed down as it came to a stop? This is because the interpolation type was set to “Bezier” which slows the change at the beginning and end of the movement.
With one or more keyframes selected in the timeline (they are yellow when selected), press “T” while hovering in the timeline. This will open a menu box to set the keyframe interpolation method for the selected keyframes.
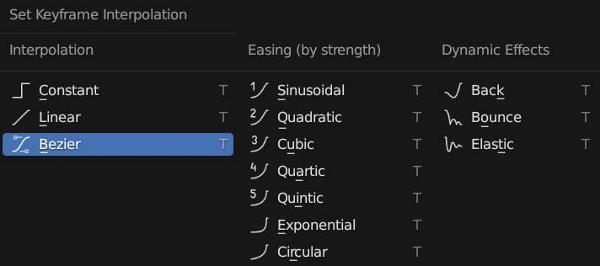
On the left are three basic types of interpolation. The other two columns include additional effects that can be added to the interpolation but we’ll focus on the basics for now.
Constant Interpolation
A constant interpolation will not change anything until the final keyframe has been reached. In the case of our cube, it would not move until frame 100 and then suddenly jump to its end position.
This is rarely the interpolation type we would want to use.
Linear Interpolation
Linear interpolation is a smooth and constant transition. The cube would move at the same speed from the start keyframe to the end keyframe. There are many times when this would be used (including for looping animations) but the perfectly constant speed does not appear realistic for most movements.
Bezier Interpolation
Bezier interpolation uses a bezier curve (discussed more in the graph editor) to have the animation start off slowly. It will then gain speed but will again slow down as it approaches the final keyframe.
This is a very common interpolation and is turned on by default. Few (if any) things in the real world start and stop without gaining and reducing speed. The bezier interpolation can be modified extensively in the graph editor to determine how much or how little of the effect is in the transition.
Changing the Default Interpolation Method
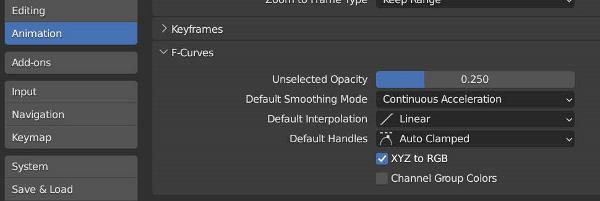
Blender will set a default interpolation method for every keyframe added. The default interpolation can be changed in Blender’s User Preferences. Go to Edit – Preferences. Choose the tab labeled “Animation” and find the Default Interpolation setting under “F-Curves.”
Auto-Keying / Automatic Keyframes
The auto keying feature in the timeline looks like a record button. Activating this will automatically keyframe any changes to the scene. This can be a very quick way to add our keyframes, but…

We NEED to make sure we turn it off when we’re done auto-keying!
Otherwise, keyframes will be placed where we don’t want them and can really screw up our entire project.
Deleting and Clearing Keyframes
In Blender, we can remove individual keyframes or entire keyframe channels. To remove a keyframe in Blender, right click on the value with the keyframe to open a context menu. We see options to delete or clear keyframes.
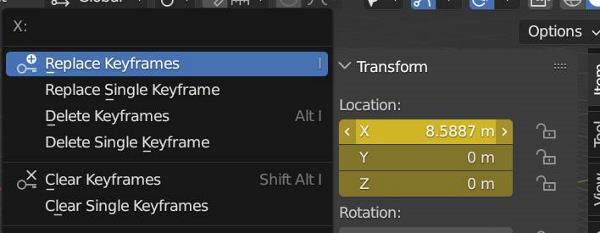
Deleting will remove the current keyframe. Clearing keyframes will remove all keyframes for that value.
Animating Other Transformations
As mentioned, change in an object’s location is far from the only thing we can animate with keyframes. Location, rotation and scale are the three “transforms” of an object. They each can be keyframed in the same way.
Animating Rotation
The rotation can be animated in the same way as an object’s location. When adding a keyframe, we choose “Rotation” as the keyframe type if we are only animating the rotation. Also, “Location and Rotation” is an option listed in which location and rotation keyframes can be added simultaneously.
Animating Scale
Along with location and rotation, an object’s scale can be keyframed the same way. If all three transforms are being keyframed together, the option of “Location, Rotation and Scale” can be chosen.
Animating Values in Blender
We can animate much more than just an object’s location, rotation and scale. Almost anything with a value that’s displayed in a slider can be assigned keyframes. By “slider” I mean the types of values shown in these images:

As you see, almost anything we could want to animate, we can in Blender.
To add a keyframe to any value, ensure you are on the frame where you wish to add the keyframe. Hover your cursor over the value and press “I.” The value slider will turn yellow to indicate a keyframe is active on the current frame.
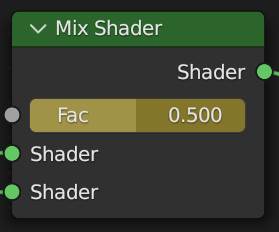
You may see value sliders highlighted in other colors as well.
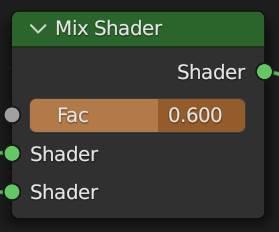
An orange slider indicates a keyframe is assigned on the current value, but that the value displayed is different than what the keyframe indicates it should be.
For example, if we had an existing keyframe on a cube’s location and we moved the cube, the current keyframe would not be updated by default. As soon as we change frames, the cube will revert to the location indicated by the keyframe.
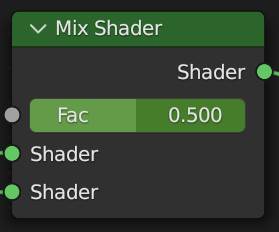
A green slider means there is a keyframe for that value, but not on the current frame of the animation.
Animating Values Example – Light Strength
As an example of animating a value in Blender, let’s say we had the light in the following image and we wanted it to increase intensity between frames 30 and 90 of our animation.
We can do this by adding keyframes to the light’s power setting found in the Light Properties Panel.
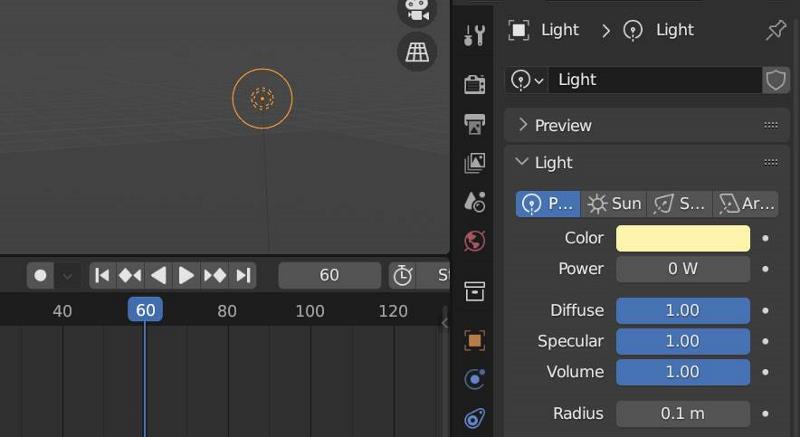
We would go to frame #30 in the animation and set the light’s power to where we want it to begin in strength – let’s start with zero power. Place a zero in the value box. Hover over the box and press “I” on the keyboard. The box will turn yellow to indicate a keyframe exists on the current frame.
Next we will go to frame #90 in the timeline. The value slider will turn green because there is a keyframe assigned to the value but not on the current frame.
We will change the light’s power value to 1000. Again, we hover over the value and press “I” on the keyboard to add a second keyframe.
Now if we play the animation, the light will have a strength of zero until it reaches frame 30. Then it will begin to climb between frames 30 and 90. On frame 90, the light will reach a power of 1,000 and remain there for the rest of the animation.
The Graph Editor and Dope Sheet
When learning animation in Blender, we will eventually encounter a need for the Graph Editor and Dope Sheet. Along with the Timeline Editor, these are the three main animation editors.
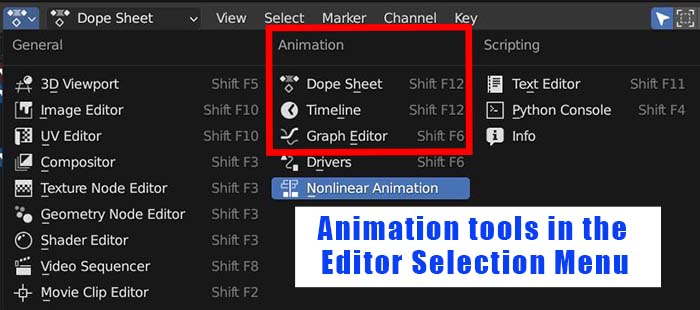
At first, they look similar to each other. However, each tool does something different than the others.
Graph Editor
The graph editor displays all keyframes assigned in a Blender file with curved lines connecting them. These curves are known as “f-curves” and plot whatever value is being animated over time to a graph.

Time is represented from left to right in the graph editor. Animation values are graphed vertically.
We can control a lot about an animation using the graph editor. The keyframes can display handles which allow us to change the shape of the f-curve the same way we would change a bezier curve in the 3D viewport.
The change in direction and curvature affects how the animation is interpolated. We can also move keyframes left and right to adjust their timing.
Animation Channels
On the left of the graph editor, we see all active animation “channels.” A channel is a single “something” that is animated. If we animate the location of an object, we actually create three animation channels – one for each axis (X, Y and Z).
The channels are displayed in hierarchical order and can be expanded. Depending on how many elements of a specific object or scene are animated, there may be several layers of channels.
Channels can be renamed, hidden and further edited individually. Unused channels can be deleted if not necessary. Channels will also appear in the Dope Sheet.
Normalize Graph Editor
Because values for different animations can vary drastically, the graph in the graph editor may be much too large or too small for us to work with. If we highlight the f-curve we want to focus on and press the “Normalize” button above the graph, Blender will resize the f-curve graph appropriately.

The Home button on the keyboard is the shortcut for normalizing the graph editor.
Graph Editor Modifiers
When in the graph editor, we can hover our cursor and press “N” on the keyboard to open a sidebar. In the sidebar are options to add modifiers to our f-curve. Each modifier does something different to the f-curve. Modifiers can be added to an f-curve even when there is only one keyframe assigned to it.
F-Curve Noise Modifier
The noise modifier adds procedural noise to the f-curve. This is great to get random effects such as when we want the strength of a light to flicker. The noise can be adjusted using the scale and strength settings in the modifier panel.

F-Curve Cycles Modifier
The cycles modifier causes the selected keyframes to repeat in a cyclical manner. Before I knew about this, I spent way too much time copying and pasting keyframes unnecessarily.

F-Curve Limits Modifier
The limits modifier adds limits to values of the animation. These limits can be placed on the X (time) or Y (value) axes. There can be upper and lower limits for each.
The modifiers can be stacked just like modifiers for objects. For example, you could add a noise modifier but then add a limits modifier as shown in the image below.

Looking for more info on the graph editor? Here’s what the official Blender manual has on it.
Dope Sheet
The Dope Sheet is another tool for viewing how an entire scene’s keyframes are arranged.
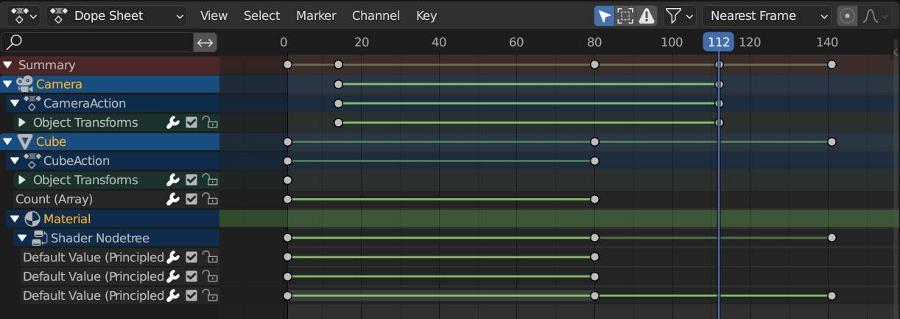
Here we can work on aligning or offsetting keyframes and tweaking the timing of our animation. While the main Dope Sheet shows an overview or “bird’s eye” of the keyframes, specific types of keyframes can be viewed using the different Dope Sheet modes (drop down in the top left corner).
Here’s the Blender Manual’s overview of the Dope Sheet Editor.
Related Animation Topics
Blender’s animation tools don’t end with keyframes. More advanced topics include:
The Non-Linear Animation (NLA) Editor converts a series of keyframes into Animation Actions and allows them to be moved, combined and manipulated similar to how video clips are handled in video editing software.
Character rigging is the process of adding a skeleton-like armature (or “rig”) to characters. The rig is attached to the character using vertex groups. Individual bones in the armature will control different assigned body parts and can be animated.
Shape Keys are tools to animate the deformation of meshes or curves. These are often used for muscles on characters and facial expressions.
Final Thoughts
Whether you’re brand new to keyframe animation or have been animating in Blender for a while, I hope this post was helpful. Take a look around the site for more useful content.
I also have a YouTube Channel with video tutorials on a variety of Blender topics. Take care and Stay Creative!
Get Brandon’s Newsletter
By submitting, you agree to receive periodic e-mails from me. You can unsubscribe at any time.
