
This guide will (almost) fully explain the User Preferences in Blender 3D. Blender’s theme, interface, navigation, keymap and system settings are found in the preferences area.
But, one of the best places to learn Blender tips and tricks is in the Blender Secrets E-Book….
This page may contain affiliate links which pay me a commission if used to make a purchase. As an Amazon Associate, I earn from qualifying purchases.
Blender User Preferences Overview
Where are Blender’s Preference Settings?
We will have many reasons to open the preferences in Blender, so the first thing we need to do is find them.
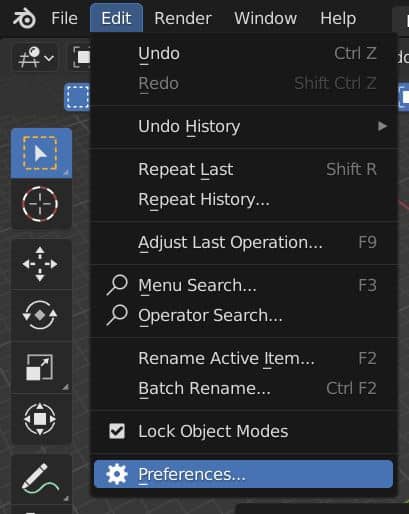
We find the preferences in Blender’s Top Bar under “Edit” and they’re way down at the bottom of the list.
Choosing “preferences” will open a new window in Blender (this is one of the few times a new window ever opens in Blender!).
Blender Preferences Sidebar Categories
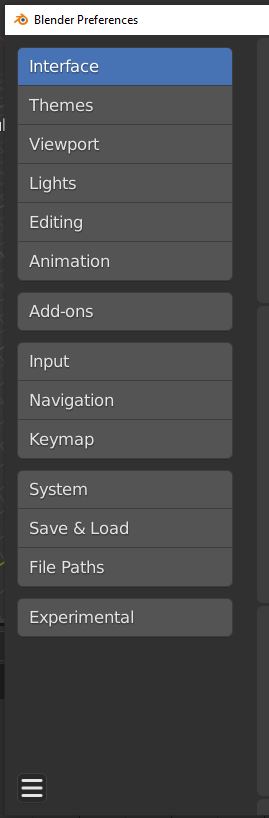
Here’s a rough overview of each category of the preferences. Each section title will jump to more detailed explanations further down.
Themes: Highly customizable visual settings for almost every part of Blender.
Viewport: Settings specific to the 3D viewport including display and selection options.
Lights: Default settings for studio lights, MatCaps and HDRIs.
Editing: More technical details about object data and specific options for different Editors.
Animation: Timeline, keyframe and F-curve settings for animations.
Add-ons: Install, activate and manage third-party plug-ins for Blender.
Input: Keyboard, mouse, tablet and other input settings (like NDOF devices).
Keymap: Blender’s inputs and shortcuts are fully customizable here.
System: Operating system, Cycles rendering hardware, memory and sound options.
Save & Load: Advanced settings for saving and loading files into Blender.
File Paths: Establish default file paths for data, renders, asset browser and more.
Experimental: Activate/deactivate Blender experimental development features.
Blender Interface Preferences
The interface preferences are where we adjust settings for display, editor, language translation, text and menus in Blender.
Display
Blender packs a lot of menus into its interface and the icons default pretty small in size. Increasing the resolution scale will increase the size of the icons, text, windows and other display elements in Blender. Lowering it will make them smaller.
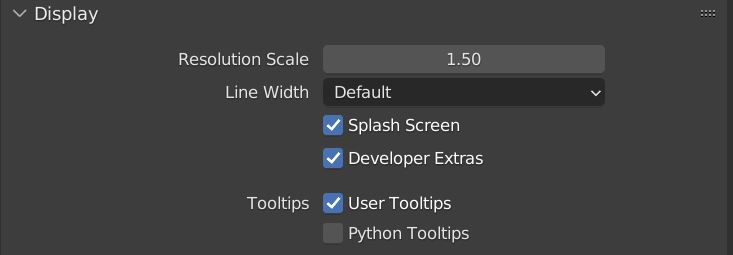
Line width adjusts the gaps between display areas, workspaces and editors. It can be set to thin, default and thick.
The Splash Screen that appears when Blender opens can be disabled with the “splash screen” checkbox.


Developer Extras activates features of Blender for developers. If you’re into programming with Python, this might be for you.
The tooltips are the helpful text boxes that appear when we hover over things in Blender. They can be turned off if we find them getting in the way.
Editors
Editors are the various “screens” and “windows” with different controls (like the Shader Editor and UV Editor). They have some interface settings we can adjust here.

Region Overlap
When “Region Overlap” is checked on, tools will appear over the editor (as if they are floating) and when it’s off, the editor screen will be separated to create padded areas for the tools and menus.
Navigation Controls

Navigation Controls: These are a series of controls that appear in different workspaces to give us another option for navigating. These are specifically helpful if we are working on a tablet computer or with a drawing tablet and pen like this one on Amazon. Otherwise, they take up space and can be turned off.
Color Picker Type
There are six options for how Color Pickers can display in Blender (color circles, color squares, HSV, etc). The defaults can be set with the “color picker type” option.
Header Position

Factor Display Type
Factor and Percentage are two options for how to express values that range between zero and one. We can choose our preference in the “Factor Display Type” setting.
Temporary Editors

Temporary Editors are editors that pop up in new windows and there are only two of them in Blender. The render window and file browser windows can be set to open in different ways instead.
Status Bar

The status bar is at the very bottom of the Blender interface. There are four display options can be toggled on and off. Scene statistics give information about the number of selected vertices, faces, objects, etc.


The Blender version shows which version of Blender we are using. System and video memory availability can be turned on to track how much of each Blender is using.
Translation

Blender’s interface can be translated into 30 languages. The languages can be displayed on the tooltips and other areas of the user interface.
Text Rendering

The text rendering settings have nothing to do with renders that we create with Blender. They are for how the text in the user interface is rendered on screen. We can control the aliasing, spacing between the letters (hinting) and even change the font.
Menus

There is an option to have menus in Blender open when we hover over them. We can set time intervals for how many seconds it takes for them to open.
Pie Menus

There are many places in Blender where pie menus are displayed. Pie menus are helpful and we may want to adjust how long they take to appear, how long they stay open and how big they are. That’s all done in the pie menu preferences.
Blender Theme Preferences
The theme preferences in Blender are almost entirely about the color of the user interface. Blender’s interface is endlessly customizable as far as colors.

Any changes to these theme settings will affect the look of Blender throughout the program. It is so adjustable though that it gets really hard to find things. Maybe “less is more” for theme colors?
Under “Text Style” there are several options for adjusting theme styles for text.

Blender Viewport Preferences
Under viewport settings, we find preferences specifically for Blender’s 3D viewport.
Viewport Display
At the top, we have three pieces of information that can be toggled on or off for display in the viewport. When on, they appear in the top left corner of the viewport.
The “Object Info” is information about the selected objects and which collection they are in.

View name will tell us if we are in perspective or orthographic view and if we are in front, side, top or another view.
The Playback Frame Rate (Frames Per Second or FPS) will tell us how fast our animation is playing in the viewport (it generally will lag slower than how it is to be rendered).
The Gizmo is a navigation tool used for transforming the location, scale and rotation of an object. Its size can be changed here.
HDRIs are images used to display around the world of our scene. Their preview size can be adjusted here.
3D Viewport Axis Display

The 3D Viewport Axis is an icon that displays in the top right of the viewport. It provides orientation for which way the axes are aligned in our current view.
The default setting of “Interactive Navigation” allows us to use the 3D Viewport Axis for moving around our view. The icon can be resized and there is an option to turn it off or remove the interactive elements of it.
Viewport Display Quality
The quality of the viewport display can be adjusted. Several options for anti-aliasing are available. Higher sample values reduce jagged and pixelated edges in the 3D Viewport.

As far as I can tell, “smooth wires” is another tool to improve the smoothness. Turning it off definitely increases jagged edges.
Texture Display

Settings for textures include an option to limit the size of the texture. Clip Alpha sets a level of transparency below which Blender will just ignore it to save computing power.
Adjusting these settings may affect responsiveness of the viewport and keep Blender from crashing.
There are two last settings. GPU Depth Picking uses depth of objects to ensure we are selecting the closest one if objects are overlapping in our view. The subdivision setting will activate the GPU for calculating a Subdivision Surface Modifier.


Blender Light Preferences
It’s surprising how few settings are in the Lights Preferences compared to other Blender user preferences. This area is really only for uploading custom Studio Lights, MatCaps and HDRIs which can be used to light our scenes in preview mode.

Blender Editing Preferences
The Editing Preferences get a little more technical. The first section is about objects and their data.
New Objects

We can toggle whether the material of a new object is linked to the object data or the object block. We can also control how a new object is aligned by default when it is added.
With “Instance Empty Size,” we control how large a default Empty Object is.
Duplicate Data

When we duplicate specific types of objects in Blender, different parts of the attached data can be duplicated. If it is not duplicated, it will be linked to the original.
Here we can individually choose which data is duplicated.
3D Cursor

“Cursor Surface Project” causes the 3D Cursor to be placed on an object’s surface when we Right Click and Select an object.
“Cursor Lock Adjust” keeps the view from jumping when we move the cursor when “Lock Cursor View” is on.’
Learn all about How to Use the 3D Cursor in Blender.
Annotations

Annotations in Blender are an option for marking up a scene with notes or other markings which do not appear when we render.
We can change the default color of the annotations and the eraser size here. Here’s a full tutorial on how to use annotations in Blender.
Weight Paint

Weight Paint is a feature in Blender to give value to vertices based on a “weight” represented in black and white. We can set custom colors for the weight paint here.
Grease Pencil

Grease Pencil is the 2D drawing component of Blender. Here are two settings that adjust how many pixels are affected when we draw with the mouse.
Text Editor and Miscellaneous

We have a setting to automatically close relevant character pairs when typing in the text editor (for Python development I assume).
We can set the default sculpt overlay color and change how far nodes automatically offset from each other.
Blender Animation Preferences
Animation is one of Blender’s most important features and in the Animation Preferences we have three areas of settings we can adjust.
Animation Timeline Settings

The Timeline Editor is for playback of our animations. We can allow a negative frame number to be used as a value. We can adjust how far apart the gridlines in the timeline are.
There are five different ways Blender can display timecodes. “Minimal Info” is the default.
We can choose different zoom options to include seconds and keyframes.
Keyframes: Auto-Keyframing Settings

Auto-Keyframing is a way of having Blender automatically add Keyframes when an animation value is changed for a frame.
This can speed up workflow but is prone to causing time-consuming mistakes when we forget to turn it off. I recommend not choosing “Enable in New Scenes.”


F-Curve Settings

F-Curves are animation tools to let us visualize and edit our animation values in the Graph Editor.
The settings here affect those f-curves. The default smoothing and default interpolation are used often.
Interpolation is how animations transition between keyframes. Bezier will be a smooth transition and linear will be a constant adjustment of the value between frames.
The color settings are for displaying different colors for different animation channels. We can adjust how subdued the transparency of unselected curves are with “Unselected Opacity.”
Blender Add-on Preferences
The add-ons section of the Preferences is both my favorite and where I spend most of my time. Add-ons are scripted plug-ins that extend Blender’s functionality. In short, they let us do a lot more in Blender. They can speed up and simplify processes.
Pre-Installed Blender Add-ons
It’s important to mention that Blender comes pre-installed with a number of useful add-ons. Some are activated by default, but many are not. In the Add-Ons Preferences, we can activate them.
Some of the most useful ones that come with Blender are Node Wrangler, Images as Planes, Loop Tools and Bool Tool.

At the top left of the add-ons preferences, we have three filters to search through add-ons we already have installed: Official, Community and Testing. We can search for addons with the search box and can choose to view only enabled add-ons.
A checked box to the left of the add-on means it is activated. If there is no check in this box, the add-on is installed but not activated.
How to Install an Add-on in Blender?

Watch this quick video for how to install and activate add-ons or see my installing add-ons post for more details.
The ability to use add-ons in Blender is very useful and here’s a list of my favorite add-ons for Blender.
Blender Input Preferences
Blender’s Input Preferences are where we can adjust settings for our “peripherals” which include our keyboard, mouse, tablet and NDOF Devices (I’ll explain that last one below).
Keyboard Preferences

Keyboard input preferences only have two options. The “Emulate Numpad” feature should be turned on if working on a keyboard without a dedicated 9-key number pad on the right.
The second option can be turned on if we want to enter advanced math formulas when transforming objects (I’ve never used it and don’t like math).
Blender works best when using a keyboard with a dedicated number pad. Here’s an affordable one on Amazon if you don’t have one. Here’s a nicer gaming keyboard if you want to go that route.


Mouse Preferences

It’s almost mandatory to use Blender with a 3-button mouse and scroll wheel. If you don’t have one, here’s an Amazon link to a cheap one and to the awesome G502 mouse that I personally use with additional programmable buttons.
If we are not using a 3-button mouse, we can select the “Emulate 3 Button Mouse” option.
The rest of these settings are for click speed, drag and other fine tuning of how to use a mouse in Blender.
Tablet Preferences
There are many cases where a drawing tablet and pen can be useful (texture painting and sculpting come to mind). The benefits of tablets over using a mouse include pressure sensitivity (very important!). I’ve always used a Wacom Intuos Pro Tablet but a lot of people seem to be using the Huion Tablets which cost much, much less.

Here we have a few settings to adjust for tablets. I don’t know enough about API settings to ever change this.
Max threshold is a scale of how Blender will interpret the amount of pressure used on a pressure-sensitive tablet. Softness adjusts the sensitivity on the low end of the pressure scale.
NDOF Device Preferences

What is an NDOF Device? It’s a special kind of mouse known as a “3D mouse” designed to work with 3D software and CAD programs. They look awesome, but as a disclaimer I’ve never actually used one.
At the time of this post, Blender is only compatible with NDOF devices manufactured by 3Dconnexion. You can take a look at their 3D Space Mouse on Amazon if interested.
NDOF devices are also used to inspect scenes in conjunction with VR headsets.
The settings in this area are specific to making adjustments to an NDOF device in Blender. They seem pretty straight-forward, but again I’ve never used one.
Blender Navigation Preferences
Navigation settings are where we control how to orbit, pan, zoom and “fly or walk” in Blender. Navigating 3D space takes a little bit of learning, but we have some navigation options we can adjust here.
Orbit & Pan

There are two types of orbiting in Blender. It’s very difficult to describe the differences in writing. Trackball is a much more free and loose method, but is more challenging to get familiar with.
Increasing “Orbit Sensitivity” will make panning our scene go a lot faster. We can slow down how fast we pan by lowering this setting.
“Orbit Around Selection” is useful. With it on, when we orbit, we will do so around whatever is selected.
The “Auto” setting is for when we transition out of an orthographic view (like front view, side view or top view). By default, we are automatically placed back into a perspective view. If we’d like to remain in orthographic view, we can uncheck “Perspective.”


“Smooth View” and “Rotation Angle” are settings to adjust the performance of orbiting and panning. I haven’t been able to notice any difference when adjusting them.
Zoom

Dolly, Continue and Scale are three methods we can choose for how to zoom. Zoom axis can be set to vertical or horizontal. Again, difficult to explain in text.
We can invert the zoom direction for both the mouse and the mouse wheel (we would use the mouse option if we didn’t have a mouse with a scroll wheel).
Sometimes Blender users previously worked in other software that had the zoom function inverted by default. This may be a more familiar way to navigate for them.
Fly & Walk
Walk Mode and Fly Mode are methods of navigating Blender which are useful for scene inspections or fine-tuning the camera position. Here’s a very short video on how walk and fly mode work.
In the navigation preferences, we choose whether we want to use walk or fly mode. We activate the chosen mode in the 3D Viewport by pressing Shift + ~ on the keyboard. Then we can navigate our scene with W, A, S and D like in a video game.

We select between Walk and Fly mode at the top. They are slightly different and we can only have one activated at a time for some reason.
In Walk Mode, we can adjust the mouse sensitivity.
Teleporting is done by pressing Spacebar in Walk Mode and we will jump straight forward in our scene. The “Teleport Duration” is how fast or slow that teleporting “jump” will be.
The walk speed can also be adjusted.
We can turn on gravity settings for Walk Mode and Fly Mode. With gravity turned on, our view will gradually “fall” as if we were falling in our scene. It probably has some uses (I just can’t imagine what they are).
Blender Keymap Preferences
Blender is packed full of features, operations, tools and other things that can be used with shortcuts or hot keys. In the Keymap Preferences, we can remap these shortcuts (called “Key-Binding”).
Often a user with previous experience with another 3D software (Like Maya, Cinema 4D or 3DS Max) will not want to re-learn a whole new set of shortcuts. Blender is notorious for being different when it comes to keymapping.
For these reasons, at the top of the Keymap Preferences, we can select from a previous configuration of Blender shortcuts or from “Industry Compatible” which more aligns with what other (paid) 3D software programs use for keymapping.
Here is my list of common keyboard shortcuts.

At the top of the Keymap Preferences are the major preferences which we will use the most. The very first is whether to select with the left or right mouse button. Until fairly recently this defaulted to right and when it changed, people had pretty strong opinions on it.
The spacebar can either play our animation, open the toolbar or open the F3 Search Panel. The list goes on and on after that.
When we want to change the keymap for an action, we expand the arrow next to it. First choose whether we want the action initiated from the keyboard, mouse, NDOF Device or other in the drop down box.

Then we click the button to the right of the drop down box and we’ll be prompted to enter the key we want to use.
Expanding the options further can allow us to specify several other fields. For example, we could highlight “Alt” or “Control” to add that to the required shortcut.
Blender System Preferences
The System Preferences contain settings for the hardware we are using Blender with (aka your computer).
Cycles Render Devices

Under “Cycles Render Devices” we choose our render hardware options based on what is available on our computer.
GPU rendering is generally superior in Cycles and these settings are completely dependent on your CPU and GPU. There are no device settings here necessary for rendering in Eevee.
Memory and Limits

“Memory and Limits” Preferences may be important if Blender keeps crashing. The “Undo Steps” is how many times we can press “Undo” before Blender will stop remembering.
We can also choose to set a memory limit on this. Lower values will free up memory.
Each of these settings could improve your computer’s performance and/or reduce memory crashes but they’re technical and we won’t be covering them in detail.
Video Sequencer Preferences

The Video Sequencer or Video Sequence Editor (VSE) is Blender’s internal video editing software. It’s not nearly as good as programs like Adobe Premiere Pro, but it’s free.
Video editing is demanding on memory and we can adjust the limit of how much memory the VSE can use. Increase it if you need (and have) more memory.
Sound Preferences

Sound is another area that can need some memory settings adjusted and this is where we can do it.
Save and Load Preferences
.Blend Files

The file type Blender uses is called a “.Blend File.” Here we have settings on saving them.
When “Save Prompt” is checked, we will be prompted to save our file when closing Blender.
If “Load UI” is checked, opening a .Blend file will open the user interface settings that particular file was stored with.
We can also choose how many previous versions to save and how many recent files to remember. More will take up more storage and memory, but could be handy. The “Auto Save” box should probably always be checked.
Expanding the arrow next to it will allow us to choose how many minutes between auto saves. Trust me, keep auto save turned on!
File Browser

The File Browser Editor is a familiar file browser to navigate our computer. We can turn on and off features such as filters, recent locations and the display of system locations and hidden files.
Blender File Path Preferences
Blender allows us to set up default file paths for both loading files into Blender and exporting our renders.
Data

We can set up default paths for Blender to look for fonts, textures, scripts (add-ons), sounds and temporary files. This can save us time spent navigating through our computers to find these every time we want to import something.
Render

We can tell Blender where to output our renders for animations. Be careful, we probably want to set individual locations for each project. We can also identify a location to cache unsaved renders.
Applications & Development

We can identify an external image editor (here’s a short video on that). The same for animation players.
The development tab is for a path to a directory of the local svn-translation copy (developer lingo).
Asset Libraries

The asset libraries section is where we set up libraries for one of my favorite Blender features – The Asset Browser. See my full guide on the Asset Browser.
Each library path is a place for the asset browser to find assets which can be used in the asset browser. We could use one library or many.
The Scatter Add-On comes with so many nature assets, I created a library just for them.
Blender Experimental Preferences

When “Development Extras” is selected in the Interface Preferences, the Experimental Preferences will become available. These are settings for developers to access experimental features which change from time to time.
Saving / Reverting Preferences

On the bottom left corner of the Preferences Panel, is a menu icon. When it’s expanded, we have four controls.
We can save our preferences manually.
If we’ve messed up our settings and want to reset them to factory preferences, we can do that.
If we have unsaved changes to preferences, we can revert to saved preferences.
We can choose “Auto-Save Preferences” to have our preferences automatically save when we change them. I’ve noticed these do not seem to save if Blender crashes. So, I usually still press “Save Preferences” after making changes.
Well, that’s all I have on Blender’s User Preferences. If you were looking for answers, I hope I helped you find them. Please take a look around the site as I am trying to provide thorough and organized Blender Tutorials and guides which are regularly updated.
Also, here’s a link to Blender’s official manual on the User Preferences, but I’ve found that further explanation is sometimes helpful.
Stay creative!
Get Brandon’s Newsletter
By submitting, you agree to receive periodic e-mails from me. You can unsubscribe at any time.