
Two great tools in Blender: Geometry Nodes & the Asset Browser. Combine them and we get even more versatility. This article will cover how to add geometry node groups to the asset browser for use in other Blender scenes. Here’s a full guide on the asset browser if you haven’t used it.

In order to use an asset in the asset browser, two things must be done:
This page may contain affiliate links which pay me a commission if used to make a purchase. As an Amazon Associate, I earn from qualifying purchases.
Creating a Node Group
In Blender, there are several areas where node groups can be used. The two main ones are the Shader Editor and the Geometry Nodes Editor. With materials, a group of nodes can be a part of a material’s nodes.
Groups are just one of several ways to organize nodes in Blender 3D.
In the Geometry Nodes Editor, the entire geometry node setup can be looked at as a group.
Why is that important?
Because node groups can be marked as assets in the asset browser. This is not a tutorial on how to make the endless possibility of creations with geometry nodes. So, I’ll have to assume you have done the following:


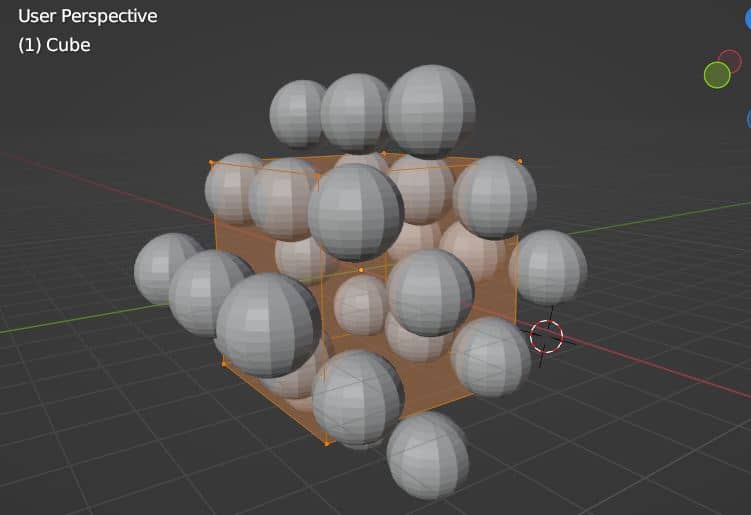
Here’s a simple example of a simple geometry node setup for demonstration.

We will want to rename the geometry node setup by double clicking the name at the top of the geometry node editor.

With shader nodes, we would have to also create a group. But with geometry nodes, the entire node tree acts as a group.
Marking a Node Group as an Asset
To mark a node group as an asset, we have to go to the outliner. We need to change the display mode from “View Layer” to “Blender File.”

Scroll down in the outliner and expand the “Node Groups” section. We should find any node groups (including Geometry Nodes) here.

Here in the outliner, we can right click our node group and choose “Mark as Asset.”

The node group will appear in the “Current File” library in the asset browser.

We can assign the node group to a catalog while in the original (current) file. We can hover in the asset browser and press “N” on the keyboard to open the sidebar. In the sidebar is an option to give the node group a custom preview image.

Saving the File
In order for the node group to be available in the asset browser, the file in which it is marked as an asset must be saved as a library path. This is done in the User Preferences under “File Paths.”
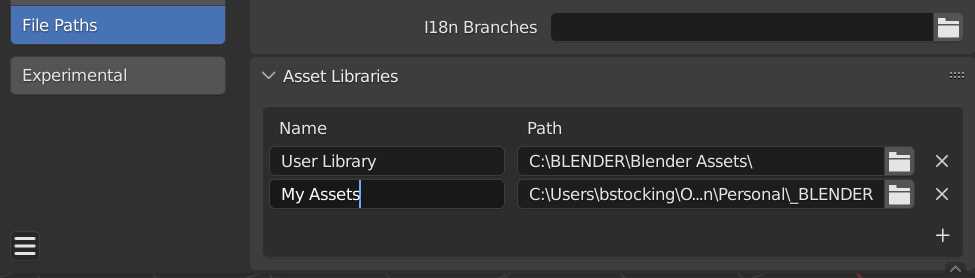
To add a new file path, press the + icon in the asset libraries section of the file paths preferences. Name the path in the left box and identify the file path in the right box.
Only marked assets that are in .Blend files saved somewhere in a designated library path are available in the asset browser!
Save your preferences.
Now the node group should be available through the asset browser in any .Blend file you use with access to the designated library file path.
Importing Node Groups from the Asset Browser
After marking a node group as an asset in a file which is located in a library path, it can be accessed in any .Blend file using the asset library. It needs to be added to an object and the object must have a geometry nodes modifier assigned to it.

With an object selected, open a geometry node editor and an asset browser editor in the workspace.

Navigate from the asset browser’s “Current File” to the library path we identified in the preferences (and where our file with the node group is saved).

The node group we saved should be found in the library we saved it in.

We can drag the saved node group asset from the asset browser into the geometry nodes editor.
And that is how we use geometry nodes in the asset browser.
Thank You
I hope you found this quick tutorial helpful. The asset browser and geometry nodes are two of my favorite features of Blender. Please take a look around my site for more tutorials and Blender 3D content. I also have a YouTube channel you can check out and an e-mail list to join below. Stay creative!
Get Brandon’s Newsletter
By submitting, you agree to receive periodic e-mails from me. You can unsubscribe at any time.