HDRIs (also called HDRs or HDR images) are High Dynamic Range Images. Many are free and they can be used in Blender as global lighting and backgrounds. Installing and using HDRIs in Blender is easy and this guide will cover everything we need to know.
This page may contain affiliate links which pay me a commission if used to make a purchase. As an Amazon Associate, I earn from qualifying purchases.
What is an HDRI Background?
An HDRI (or more specifically an “HDRI map”) is a panoramic image which spans 360 degrees. The HDRI image can be mapped to 3D space in 3D graphic software like Blender.

HDRIs contain a large amount of color data, much more than standard images like JPG or PNG. Standard images use a brightness range from 0 (black) to 255.
This range is optimized for display on monitors but real-world lighting has a much broader range. HDR images use 32-bit color instead of 8-bit color (JPG) or 16 bit (PNG). Their file sizes are proportionally larger as a result.
This extra data gives the image more information about the brightness of every pixel. Using HDRIs to light a 3D scene is the simplest way to get realistic lighting. Next we’ll discuss where to get free HDRIs (don’t pay for them!) and how to install them in Blender.
Below is a video from my YouTube Channel all about HDRIs.
Where to Get Free HDRIs
There used to be a decent market for HDRIs but now there’s no need to pay for them. A quick Google search for “Free HDRI” should do the trick. The first place to start is definitely PolyHaven.com.

When using Poly Haven, we can search for outdoor HDRIs and indoor HDRIs. They are well-organized and categorized. For example, with sky HDRIs, we can search by cloud coverage or by time of day (sunset, sunrise, afternoon, night, etc).
There is an entire category of studio HDRIs which simulate the lights of a studio. These are great for putting 3D models on display with professional scene lighting.
Poly Haven now has an add-on to bring all of their free assets directly into Blender. Here you can learn all about the Poly Haven asset browser add-on.
HDRI Background File Types
When browsing HDRI files, we run into a few different file types. Most are HDR and EXR. Both offer very high dynamic ranges and will work well to light a scene. Normally the EXR file is larger in size.
We also occasionally see JPEG, PNG or TIFF file types as HDRIs. These are not truly high dynamic range images but are formatted to wrap around a scene in the same way. Using lower dynamic range images will give us a background but will not have the lighting detail provided by true HDRIs.
We also see a variety of resolutions for HDRIs – many of them very large. Which resolution size we want will depend on what we are using the image for and how big of a file we are willing to use.

If we are using the HDRI only for lighting and it will not be visible in the scene, we can choose a lower resolution. If the HDRI is providing background imagery to the scene (such as a sky) we want a higher resolution.
Because these files stretch the entire 360 degree scene, a high resolution is necessary to maintain a high quality image.
8K is what I would look for if going for quality. If the background imagery is not a huge focal point or it will be blurred or obscured in the scene, 4K should be fine. If we are only using the HDRI for lighting, even lower may work.
Here are the differences in file sizes for various versions of the same HDRI I sampled from Poly Haven:
| RESOLUTION | HDR | EXR |
| 1K | 1.54 MB | 5.65 MB |
| 2K | 6.23 MB | 21.19 MB |
| 4K | 25.29 MB | 81.69 MB |
| 8K | 99.7 MB | 319.05 MB |
| 16K | 378.86 MB | 1.22 GB |
| 20K | 585.98 MB | 1.91 GB |
How to Install an HDRI Background in Blender
To use an HDRI for scene lighting in Blender, we need to add it to our “world.” The “world” in Blender is the infinite 360-degree space around our scene. It’s the globe-shaped background of a scene.
HDRIs are formatted to wrap around the scene much like a map image is wrapped around a globe.
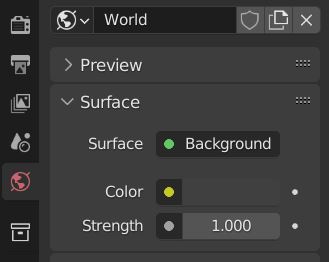
The World Properties tab in the Properties Panel is dedicated to settings for our world. Fittingly, the icon for the tab is an image of a globe. By default the world has a solid color. We will only be able to see the world background in Render Preview Mode.
There is an option in the settings to “Use Nodes” which will need to be turned on to place an HDRI. Activate this and then go to the Shader Editor. If you don’t see the “Use Nodes” button then it’s already turned on.
In the top left of the Shader Editor is a box which will display “Object.” Change this selection to “World.” Now whatever we do in the Shader Editor will be affecting the world instead of object materials.
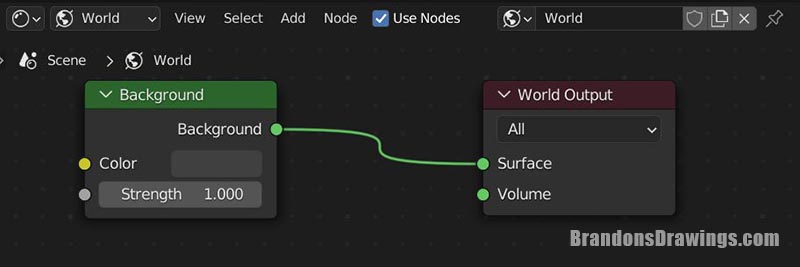
The default shader setup is a Background Node plugged into a World Output Node. We press “Shift + A” to search for an Environment Texture Node. Plug the color output of the Environment Texture Node* into the color input of the Background Node.
*Here’s the Blender documentation on the Environment Texture Node.
If we are in Render Preview Mode we will notice the world has turned pink because there is no image loaded into the Environment Texture Node yet.

On the Environment Texture Node, click “Open” and a file browser will appear. Navigate to the location of the HDRI on your computer. Choose “Open Image.” The HDRI will load into the scene.
How to Adjust an HDRI Background in Blender
We adjust the strength of the HDRI from the strength slider in the background node. A higher strength will make the world brighter and will give off more light.
To adjust the positioning of the HDRI, we add a mapping setup to the nodes. This includes a mapping node and a texture coordinate node as shown below. Here’s more on how to rotate an HDRI in Blender.
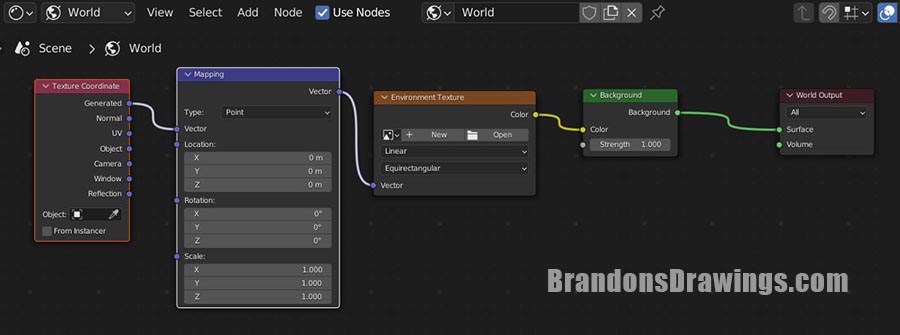
If we have the Node Wrangler Addon installed, we simply select the Environment Texture Node and press “Control+T” to add the mapping setup. It will add the Mapping Node and the Texture Coordinate Node.
The most common adjustment we would make is rotation – the rotation on the Z axis specifically.
When we change the rotation of the Z axis, the HDRI should spin around our world. To make further adjustments, experiment with the X and Y axes.
Adjusting the location might be useful but make very small adjustments as too much will distort the image. We almost never want to scale the HDRI but if we did, the scale options in the Mapping Node would allow us to.
Because this is a node setup, we can of course add all sorts of nodes to adjust the look of the HDRI just as we would with materials.
For example, we could add a “Bright Contrast” Node between the Environment Texture Node and the Background Node to adjust the brightness and contrast of the HDRI. We could do the same with a Hue/Saturation Node or any other node for color correction.
HDRIs for Lighting
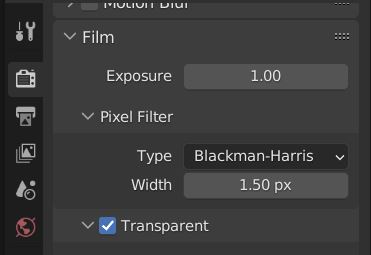
We can use HDRIs for lighting even if we don’t want to see the HDRI in the background. To do so, we have to render with a transparent background.
We go to the film setting in the Render Properties Panel and check the box for “Transparency.”
Here’s a full explanation on how to render a transparent background in Blender.
Also, if you are lookin for a more complete tutorial on lighting in Blender, I have a full lighting manual for Blender that may help.
Create an HDRI “World Library”
If you’re interested in setting up a “World Library” full of HDRIs, it can be done using the Blender Asset Browser. I have a tutorial on YouTube for how to do it.
Get Brandon’s Newsletter
By submitting, you agree to receive periodic e-mails from me. You can unsubscribe at any time.


