A starting point for beginners in Blender 3D is learning how to select objects and/or geometry. We will cover over 20 ways to make selections in both Edit and Object Mode. Even advanced users might learn something about how to select in Blender.
This page may contain affiliate links which pay me a commission if used to make a purchase. As an Amazon Associate, I earn from qualifying purchases.
In this post, we cover the following ways to select objects or geometry in Blender. Feel free to jump ahead!
When Something is Selected in Blender
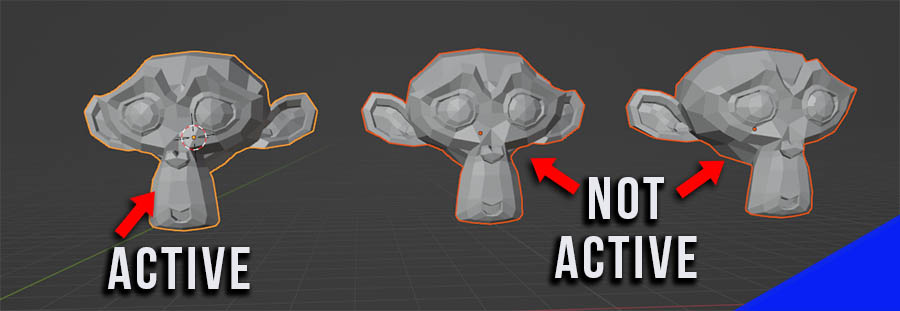
When an object (in Object Mode) or part of a mesh (in Edit Mode) are selected, the selection will be outlined in orange. We may notice one part of a selection outlined in yellow while others are orange. This is how Blender indicates active vs non-active selection.
Active Selection vs. Non-Active Selection
“Active Selection” is a term you’ll hear often in Blender. When multiple objects or parts of a mesh are selected, one element will be the “active selection.” This may also be referred to as the “Active Object” in Object Mode or the “Active Mesh” in Edit Mode.
The actively selected element will have a yellow outline while non-active selections will have an orange outline. If only one object or mesh element is selected, it will be the active element. There won’t be a non-active one.
In vertex select mode, the active vertex will appear white while the others are orange.
For many operations, it doesn’t matter whether something is actively or non-actively selected. But for others it is important.
For example, if we want to copy a material from one object to many objects, we tell Blender which object we want to copy FROM by making it the active object.
How to Deselect in Blender
If we have something selected and wish to deselect it, we can click into open space (where there’s nothing to select) in the 3D viewport. This will deselect what was previously selected.
In Blender, we can use the keyboard shortcut “Alt + A” to deselect everything in a scene.
If we have multiple things selected in Blender (Object or Edit Mode) and we want to remove just one element from the selection, hold shift and left-click the element. We may have to do this two times for the element to become unselected.
1. Basic Left-Click Selection
In Object Mode, the most basic way to select is by left-clicking an object.

In Edit Mode, our basic selection is based on our selection mode. We can choose vertex select, edge select or face select. Each selection type allows us to click on the respective elements of our mesh.
Select Multiple Objects in Object Mode
In Object mode, we manually select multiple objects by holding shift and left-clicking the objects we want to select. The object we select last will be the active object.
Select Multiple Vertices, Edges or Faces in Edit Mode
To individually select multiple vertices, edges or faces in Edit Mode, hold shift on the keyboard and left-click the parts of the mesh we want to select.
2. Box Select
In Blender, “Box Select” allows us to drag our cursor to create a box in the 3D viewport. Whatever is inside the box will be selected. This works in both Object Mode and Edit Mode.
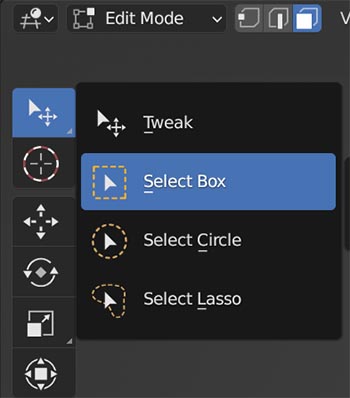
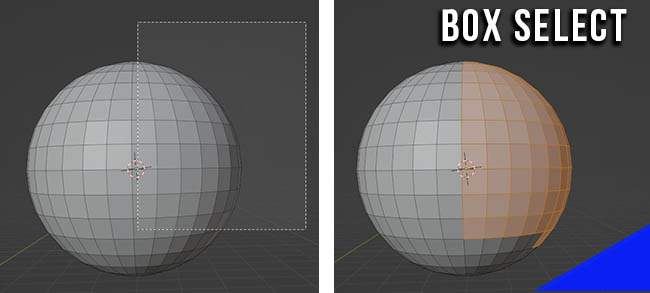
To box select, click and hold the selection tool in the tool panel and choose “Select Box.”
Or we can use the keyboard shortcut “B” to enter box select mode in both Object Mode and Edit Mode.
3. Circle Select
“Circle Select” turns our cursor into a circle and selects whatever we move our cursor over while we left-click and drag. While circle selection works in both Object and Edit Mode, you’ll use it the most in Edit Mode for selecting dense areas of geometry.
To activate Circle Select, left click and hold the selection tool in the toolbar. Choose “Select Circle” from the list.
The keyboard shortcut for Circle Select in Blender is “C” on the keyboard.
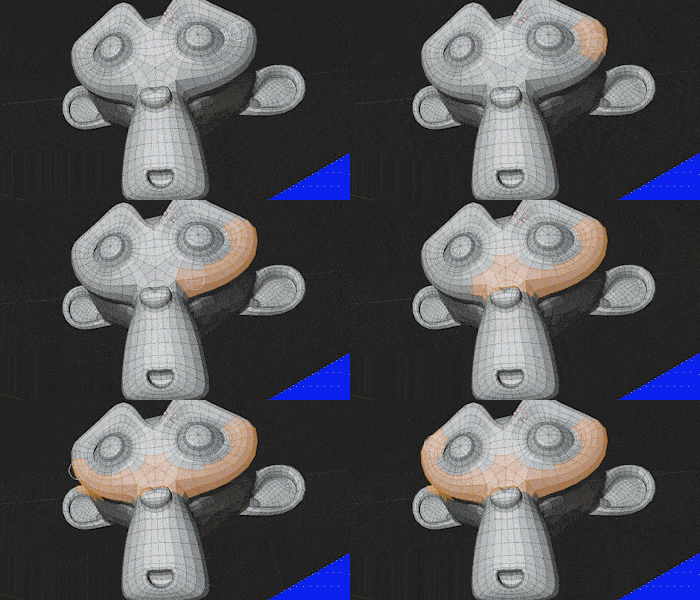
Left-click and drag the mouse across geometry to select it. This works in vertex, edge and face select modes.
4. Lasso Select
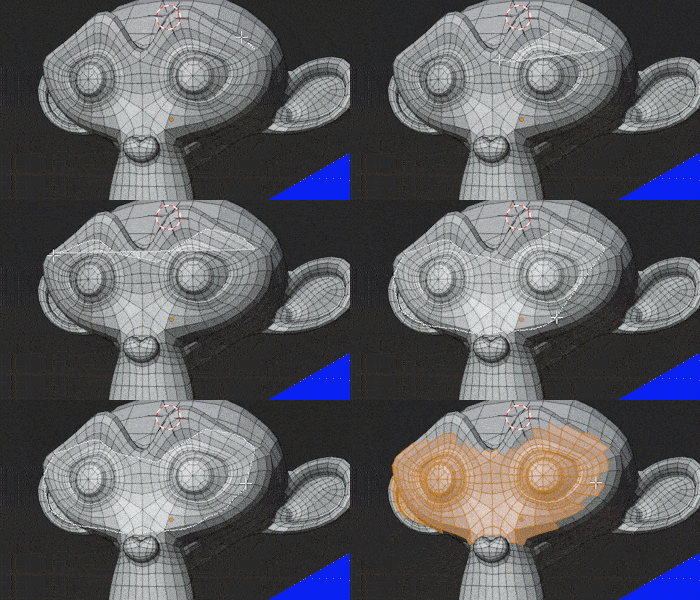
The last option from the selection toolbar menu is “Select Lasso.” With this, we drag our cursor around the viewport to create a closed shape.
Whatever is inside the shape will be selected.
Unlike Box Select and Circle Select, there is no designated keyboard shortcut for lasso select in Blender by default.
5. Select All
The shortcut to “Select All” in Blender is “A” on the keyboard.
In Object Mode, this will select all objects. In Edit Mode, it will select the entire mesh or all points of a curve object. It will work in vertex, edge or face select mode.
6. Select Loops & Rings
Something you’ll often need to do when 3D modeling in Blender is to select loops or rings. These are connected elements that go across many other pieces of geometry.
We can use this to select vertices, edges or faces in Edit Mode.
To select an edge loop or ring in Blender, hold “Alt” on the keyboard while you select along the edge or ring.
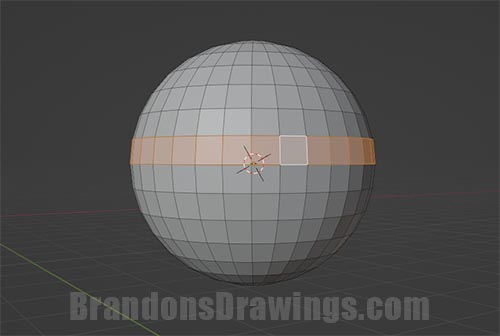
The selection will travel as far as it can depending on the geometry. Once it runs into ngons or other mesh issues, the selection may stop.
7. Select Shortest Path
This is an Edit Mode selection tool that selects connected geometry between two elements in the shortest possible path.
It works in vertex select, edge select and face select modes.
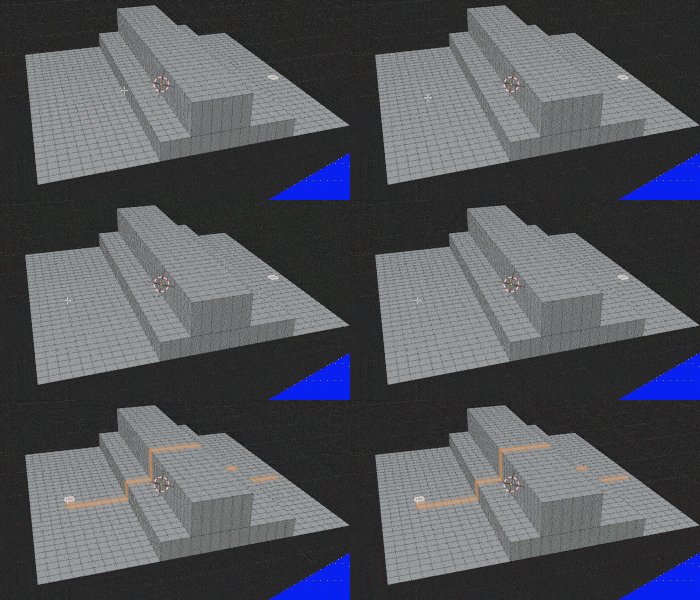
We first select a starting piece of geometry (vert, edge, face) and then select where we want the selection path to run to. While holding “Ctrl” on the keyboard, select the ending element of the mesh. The two elements and a line of geometry between them will be selected.
8. Select More / Less
When we have an Edit Mode selection already made in Blender, we can increase or decrease the selection area.
First, make the initial selection. Then press “Ctrl” and the plus sign (+) on the number pad to increase the selection area. Press “Ctrl” and the minus key (-) on the number pad to shrink the selection.
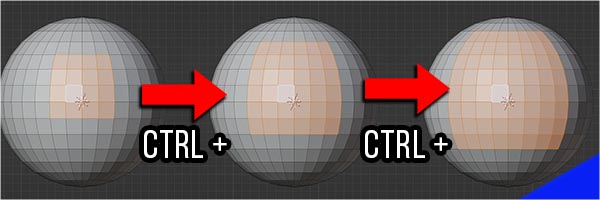
If we shrink the selection to nothing, we will not be able to increase its size.
9. Invert Selection
If we have some items selected in Edit Mode and others unselected, we can invert our selection using the keyboard shortcut “Cntrl +i.” When we do this, whatever was selected will become unselected while what was not selected will now be selected.
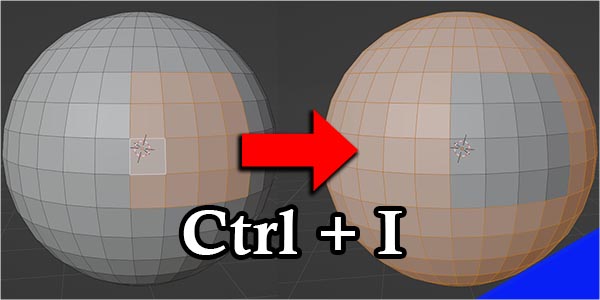
To invert the current selection in Blender, hover the cursor in the 3D viewport and press Control + I on the keyboard. (I as in Idaho)
This works in both Object Mode and Edit Mode.
10. Select All by Type
This selection tool is specific to object mode. Imagine wanting to select all mesh objects in a scene.
Using the “Select All” option would select the mesh objects but also lamps, cameras, empties and everything else.
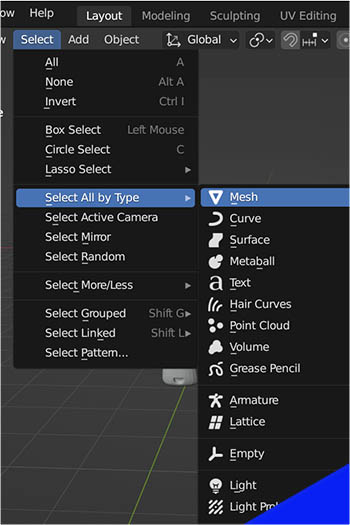
While in Object Mode, the selection drop-down from the top menu contains an option to “Select All by Type.” Hovering on the option will show a list of object types.
Choose the type of objects we want to select and it will select all of them. It will leave other object types unselected.
Extend the Selection in the Operator Panel
This operation will (by default) unselect whatever we had selected before. We can change this in the operator panel that opens in the bottom left corner of the screen.
Expand the operator panel and check the box labeled “Extend.” This will add the selection to the previously selected objects.
11. Select Random
The “Select Random” operation does what you probably think based on its name. In Object and Edit Mode it creates a random selection based on what is visible in the scene. We then have controls for the randomization.
To use make a random selection, go to the Selection drop-down from the top menu in the 3D Viewport and choose “Select Random.”
In object mode, a random selection of objects will be made. This will be made from all visible object types including cameras and lights.
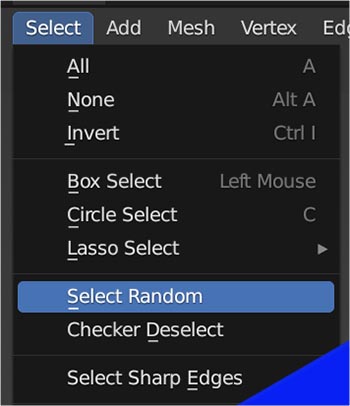
If you would like to exclude objects from being selected, hide them first by selecting them and pressing “H” on the keyboard. In Edit Mode, the random selection will be of vertices, edges or faces depending on our selection mode.
Adjusting the Random Selection
Following the Select Random operation, an operator panel will open in the bottom left corner of the 3D viewport.
Expand the operator panel to find settings to adjust the random selection.
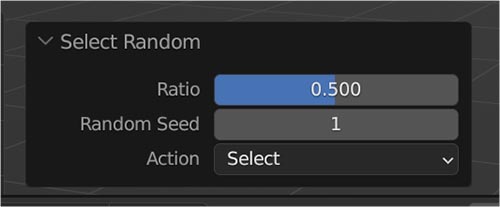
The ratio defaults to .5 which selects 50% of the unhidden objects or geometry. Increasing the ratio will cause more elements to be selected randomly (at “1.000” everything will be selected.
Decreasing the ratio will cause fewer elements to be selected. Zero will cause nothing to be selected.
If we don’t like the randomization, changing the “Seed” value will cause a new randomization. If we choose the “Action” drop-down, we can invert the operation so it randomly de-selects elements.
12. Checker Deselect
Ok, this technically is a “de-selection” tool rather than a selection tool, but it’s worthy of inclusion. Checker Deselect is useful for selecting (or unselecting) mesh in a specific pattern. This is only available in Edit Mode.
To use “Checker Deselect” we first must make a selection. For demonstration, I’ll select the entire mesh of a subdivided default cube.
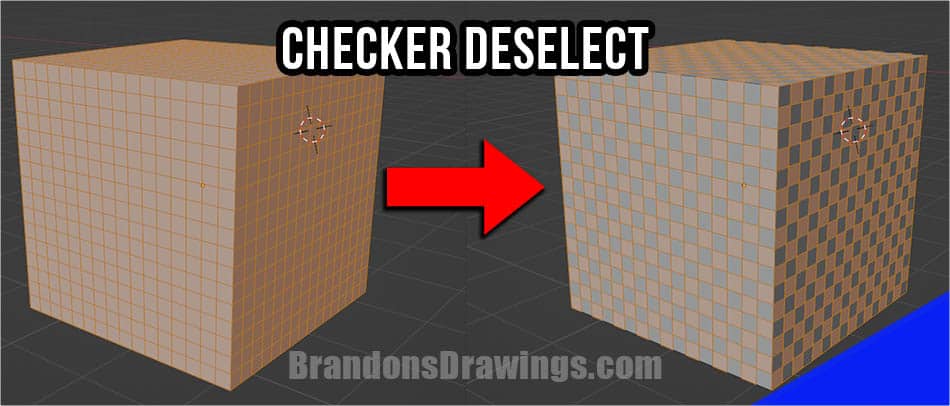
In Edit Mode, let’s go to “Select” in the 3D Viewport menu and choose “Checker Deselect.” By default, it will create a 1:1 checker pattern of everything that was originally selected (unselected mesh won’t be affected).
Adjust Checker Pattern
In the operator panel which opens at the bottom left of the 3D viewport, we can change the checkered pattern.
We can increase or decrease the number of adjacent selected elements (vertices, edges or faces).
We can do the same with the unselected components.
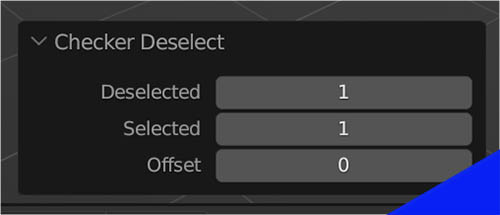
The “Offset” setting will move the selection pattern in one direction by one element for each value we input.
13. Select Linked
This is another selection tool which only works in Edit Mode. It selects all geometry linked to a designated element.
To select linked geometry, hover over a piece of geometry (a face for example) and press “L” on the keyboard.
By default, all geometry that is physically connected together with the face we hovered on will be selected.
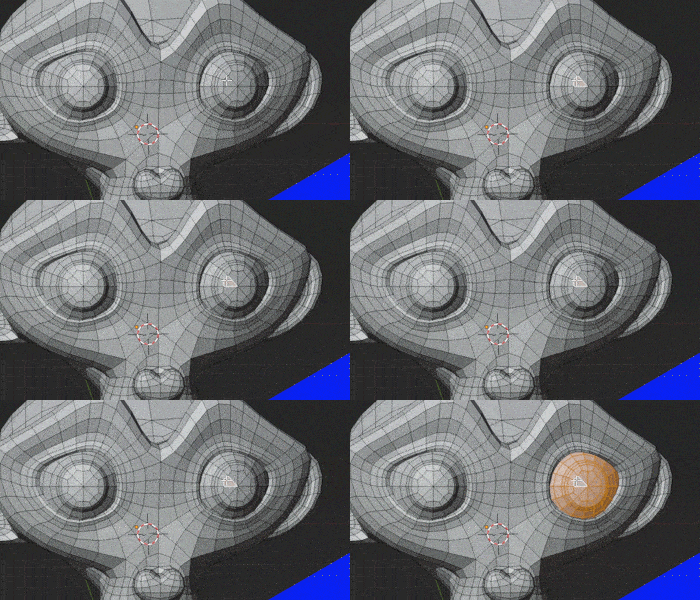
This can be modified by opening the operator panel which appears in the bottom left corner of the 3D viewport.
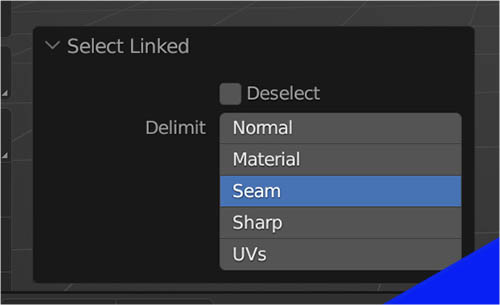
We find an option labeled “Delimit.” This is how the linked selection will be limited. One of several options is “Material.” Selecting this will limit the linked selection to the geometry with the same material as what we hovered over.
Get familiar with this tool and you’ll find it saves a lot of time over manually selecting parts of a mesh.
14. Select Similar
This may be one of the most useful selection tools in Blender. “Select Similar” allows us to select geometry that shares characteristics with currently selected geometry. Here’s an example.
Let’s say I wanted to select all the windows in the building pictured below. No materials are applied, so we can’t select by material. The windows all share a few common characteristics though. The windows on each side are “coplanar” with each other. Also, the windows are all the exact same size.
Let’s select a window and go to the “Select” drop-down from the viewport menu at the top of the screen. Choose “Select Similar.” Then choose the characteristic for which we want all selected portions of the mesh to share.
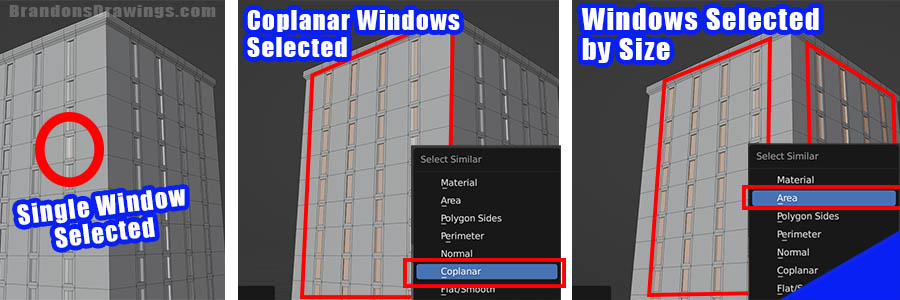
As you can see above, selecting “Coplanar” selects all the windows on the same side of the building. Choosing “Area” selects all faces with identically sized areas, which ends up being all the other windows.
We can also select similar geometry based on material, number of polygon sides, perimeter measurement, normals and more.
The Blender keyboard shortcut for “Select Similar” in Edit Mode is “Ctrl + G”
Ctrl + G will open a similar set of options in Object Mode called “Select Grouped.”
15. Select All by Trait
The “Select All by Trait” feature in Blender may sound a lot like “Select Similar” but they do different things. This is an Edit Mode selection tool and has a few ways it can work.
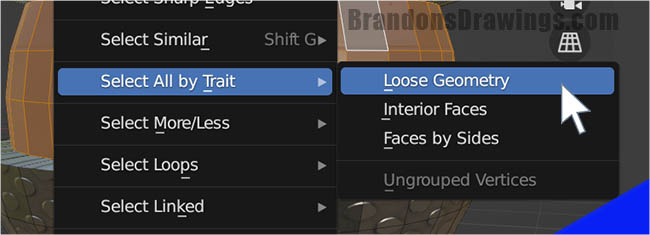
To select all mesh by similar attributes, you do not need to have anything selected. Go to the “Select” drop down at the top of the 3D viewport. Choose “Select All by Trait.” Depending on what geometry is available, you will see some or all of the following options.
These options select geometry differently based on whether we are in vertex, edge or face select modes.
Select Non-Manifold Mesh
In Blender, a manifold mesh is a mesh that is fully enclosed. A complete cube or sphere would be manifold. They have an enclosed interior. A plane or a cube missing one of its sides would not be manifold.
In vertex select mode, we have an option to select all non-manifold mesh segments. This can help identify which parts of a mesh are not closed.
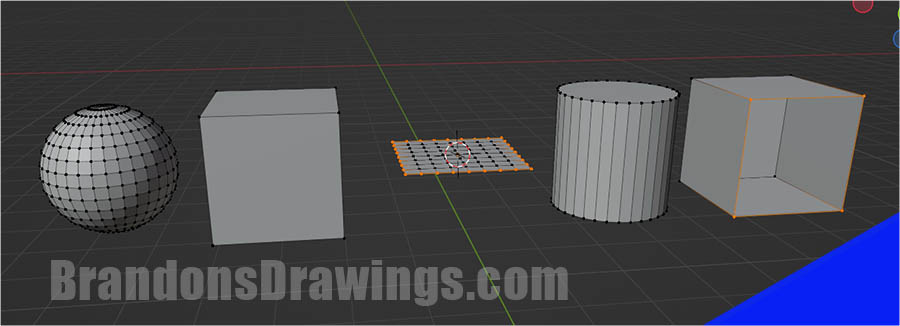
When we choose to select non-manifold, we are instructing Blender to select all non-manifold meshes. In the example above, the plane and incomplete cube will be selected.
Select Loose Geometry
How the “Select Loose Geometry” tool works will be different depending on if we are in vertex, edge or face select mode. It will select any individual and unconnected elements of the type we are choosing (vertex, edge or face).
For example, if we have a single, unconnected edge consisting of two vertices and choose to select loose vertices, there will be none. The two verts are connected. If we are in edge select mode, the edge will be selected because it’s an unconnected edge.
Select Interior Faces
Blender’s definition of what this feature does is “Select faces where all edges have more than two face users.” I’m still exploring what this means. I can’t find a practical use for it.
Select “Faces by Sides”
This on the other hand is extremely useful, especially if you’re looking to clean up some messy geometry. Choose “Faces by Sides” and then look for the operator panel which appears in the bottom left corner of the 3D viewport. Expand the panel if it’s collapsed.
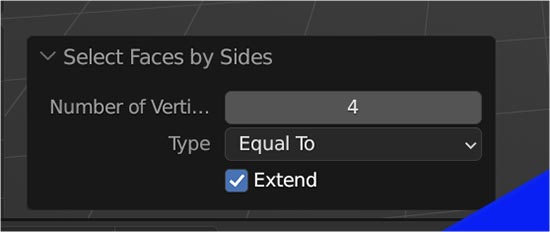
The first setting in the operator panel sets how many vertices a face must have and the “Type” setting decides how to select based on this number.
For example, the default type is set to “Equal To” so all faces with the set number of vertices will be selected. If we set the type to “Greater Than” all faces with more than the number of vertices will be selected.
Similarly we can use the “Less Than” or “Not Equal To” options to select faces meeting our criteria.
16. Select Mirror
“Select Mirror” functions differently in Edit Mode and Object Mode. In Edit Mode, choosing “Select Mirror” from the selection menu in the 3D Viewport will change the current selection to mirror it. Here’s an example:
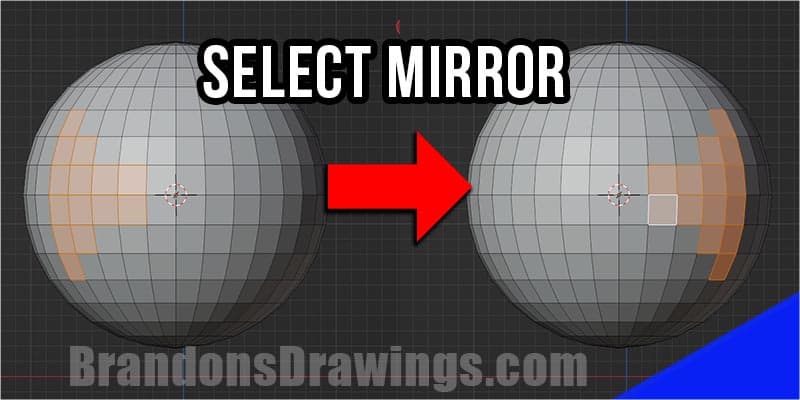
In the Operator Panel which opens at the bottom left of the viewport, you can change the axis on which the selection is mirrored and choose to extend the selection (add it to what was already selected) rather than replace the selection.
In Object Mode, “Select Mirror” will select mirrored objects based on their naming conventions. For example, if you have an object named hand.right selected. It will look for the hand.left object and select that instead.
17. Select Side of Active
In Edit Mode, we can use the side of active to select everything on one side (left, right, top, bottom, etc) of the actively selected mesh element. In the Operator Panel which opens after the selection, we can change the axis along which the selection occurs.
18. Select Pattern
“Select Pattern” is a tool in Blender’s Object Mode to select objects based on object name characteristics. Nothing needs to be selected to begin with. This tool can help when you want to select many objects that share a similar name.
Go to “Selection” at the top of the 3D Viewport and choose “Select Pattern.” A window will open with a single line to type into.
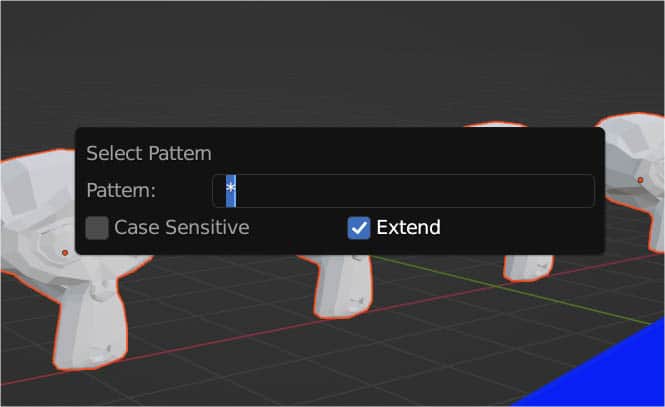
Type in the name you want all objects to contain in order to be selected. Use ? as a wildcard for a single character or * for multiple wildcard character.
19. Select Material
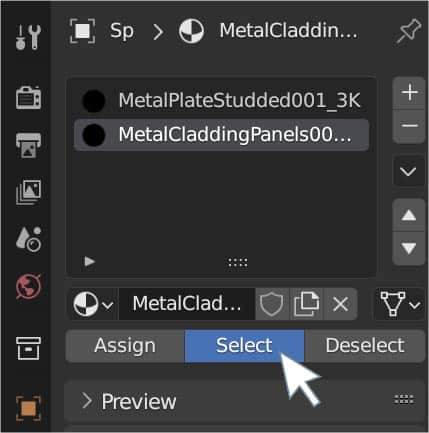
In Edit Mode, we can select all geometry with a specified material assigned to it. To select all parts of a mesh with a certain material, go to the Materials Properties Panel in Edit Mode.
Select the material you want. Then press “Select” beneath it and all parts of the geometry assigned that material will be selected.
They will be added to any current selection and there is also an option to “Deselect” the geometry in the selected material slot. I use this feature quite a bit.
20. Select Vertex Group
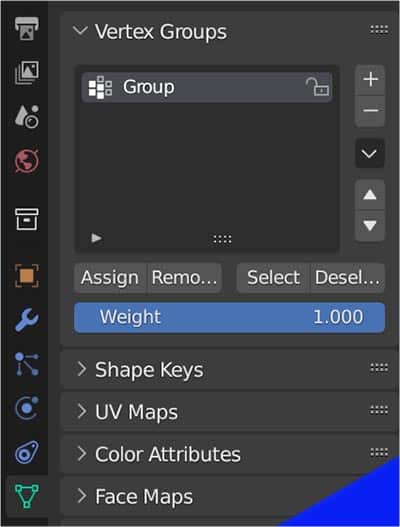
In Blender, we can create vertex groups and then add specific vertices to them. These can later be useful for many operations, but also as a selection tool.
Vertex groups can be added, edited and selected in the Object Data Properties. First create a vertex group, then select vertices and press “assign” to add selected vertices to the group.
Then we can use the “Select” and “Deselect” buttons for the selected vertex group.
Conclusion
This article has covered at least 20 ways to select objects and mesh in Blender. That’s a lot and I’m sure there are more out there. I hope you found it helpful, please have a look around the site, find me on social media and take a look at my tutorials on YouTube. Stay creative!
Get Brandon’s Newsletter
By submitting, you agree to receive periodic e-mails from me. You can unsubscribe at any time.


