
In Blender, normal maps are a way to add detailed bumps and ridges to materials. The benefit of normal maps is they don’t add extra geometry to our objects.
We obtain a lot of realism from normal maps with very little sacrifice in performance or render times. Read on or watch the following video to learn how to use normal maps in Blender.

This page may contain affiliate links which pay me a commission if used to make a purchase. As an Amazon Associate, I earn from qualifying purchases.
What Are Normal Maps in Blender?
To understand normal maps, we probably need to understand a little about Normals in 3D software. Every face, vertex and edge in an object faces a specific direction.
This direction is known as the “normal” and it’s used to calculate how light interacts with a surface. Often when we experience problems with shading, it’s because the normals are not aligned or have been flipped.

A normal map is an image that tells Blender (or other 3D programs) to adjust the normal direction slightly on a per-pixel basis. This allows very fine details to be calculated just by adjusting how the light interacts with a surface.
Normal maps require three dimensional information. That means they need information about how a normal is to be adjusted along the X, Y and Z axes. Normal maps use a clever method of coding information for each axis into red, green and blue – also known as RGB – color information.


Then all of the information can be saved into a simple image file that can be interpreted by the render engine. It’s actually quite genius.
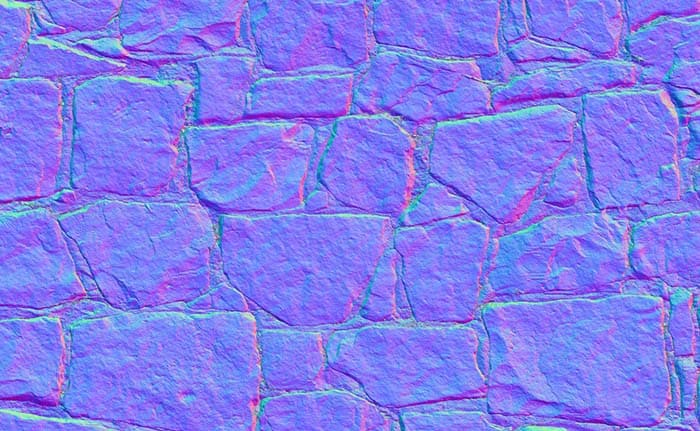
If you’ve bought or downloaded a PBR material, you’ve received a series of image files. One of those files is a purplish-looking one. This is the normal map. That purplish-color is the combination of red, green and blue which represents normal information for the x, y and z axis of the material.

As an experiment, I took an image and painted it with pure red, green and blue. I plugged the image in as a normal map. Each of the three colors adjusts the normal in a slightly different way. A full normal map uses complicated calculations to map out the adjustments to an object’s normal.
How to Use Normal Maps in Blender?
So we have a PBR texture that came with a normal map. You can get these from Poliigon and may other sites. In the Shader Editor, we will set up our PBR material. I have a full video on setting these up if you need it.


Before adding PBR textures, we may have to UV unwrap the object.
We will usually use Blender’s Principled BSDF shader which has many inputs for different types of maps that come with PBR materials. Down on the bottom is the “Normal” input. It’s purple which indicates it accepts vector information.
Add the normal map into the Shader Editor by either:
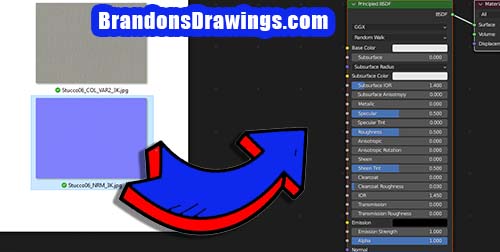
Because the normal map is adding data that isn’t meant to affect the color of the material, we need to change the “Color Space” from “sRGB” to “Non-Color” on the image texture node.
Next we need to connect the “Color” output from the Image Texture Node to the “Normal” input of the Principled BSDF Shader. Because the “Color” output is a yellow (color information) socket and the “Normal” is a purple (vector information) socket, we need to convert the data to vector data.
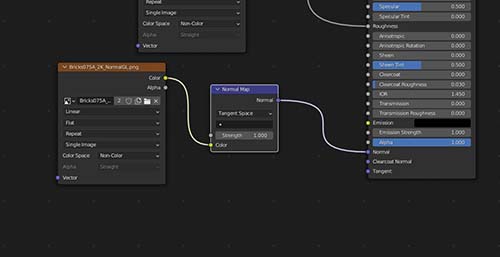
There is a node designed specifically for this and it’s called the Normal Map Node. It can be found in the “Vector” category when we press “Shift+A” to add a node. Place the Normal Map Node between the color output of the Image Texture and the normal input of the Principled BSDF.


We should see the normal map affecting the surface of the material if we are in material preview or render preview mode. Even with the default strength of 1, it should add a fair amount of realistic shading to the material.
We can increase the strength setting on the Normal Map Node to get a stronger effect.

When setting up PBR materials, we usually want to add a mapping node and texture coordinate node so all the maps use the same mapping coordinates. Again, this is covered pretty well in my PBR Materials Video.

EEVEE vs. Cycles for Normal Maps?
Normal maps work in Eevee and Cycles render engines. They are set up the same way. My only words of advice are to keep the strength a little lower in Eevee. It starts to look fake when it gets too strong. With Cycles, stronger normal maps look great so feel free to crank the strength up.
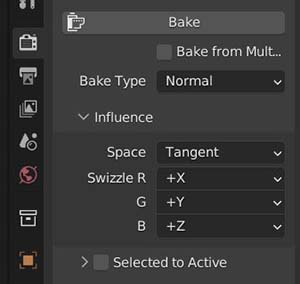
Baking Normal Maps
Normal maps can be created in Blender by baking. This is beyond the scope of this tutorial, but I’ll cover the concept.
We sometimes create a highly detailed model – perhaps through sculpting or hard surface modeling. If we need the geometry optimized, perhaps for an animation or video game, we may need to reduce the amount of geometry in the mesh.
We can bake the physical details. Part of this process will be baking the color of the materials but we can also bake the geometry into a normal map. Then, we’d simply plug the newly baked material into a lower polygon mesh.
Again, this baking process is a little more advanced but it’s another possibility with Blender.


Final Thoughts
Normal maps are an incredibly efficient way to add realism to a material without adding any geometry. They’re used frequently in video games to add realistic shading effects without slowing down the responsiveness needed for real-time rendering.
I hope this helped. Please take a look at other tutorials on the site or YouTube channel and sign up for my e-mail list below! I don’t spam you I promise. Thank you for reading and Stay Creative!
Get Brandon’s Newsletter
By submitting, you agree to receive periodic e-mails from me. You can unsubscribe at any time.