
Blender 3D is a robust software which uses all kinds of data to create incredible 3D worlds. This quick guide will explain how data blocks work in Blender. We will cover “Fake Users” (and why they’re important), packing external resources, finding missing files and more.
This page may contain affiliate links which pay me a commission if used to make a purchase. As an Amazon Associate, I earn from qualifying purchases.
A quick video explanation of Blender data.
A Quick Lesson on Data in Blender
Blender organizes different types of data into data blocks. There are many types of data blocks in Blender. Mesh objects, curves, materials, lights, worlds, collections and images are just some of the categories of data blocks.
Each data block type does something unique. Therefore each data type has its own set of controls and settings. For example, lights have different settings than mesh objects. Brushes have different uses than lights (and so on).
In general, the existence of different data block types isn’t necessary to understand. Here’s the official documentation from Blender on data blocks. What is more important is how Blender stores, saves, uses and purges data in a .Blend file.


Users of Data
When a Blender file is using a specific piece of data, that data is referred to as having an assigned “user.” For example, if a material is being used on an object, the object is the material’s user. If an image is assigned to a material, the material is a user of the image. Data blocks can have one or many assigned users.
Being able to assign a single block of data to many users is efficient. If a material is used by many objects, Blender only has to save and remember one material rather than one for each object which uses it.


Orphan Data
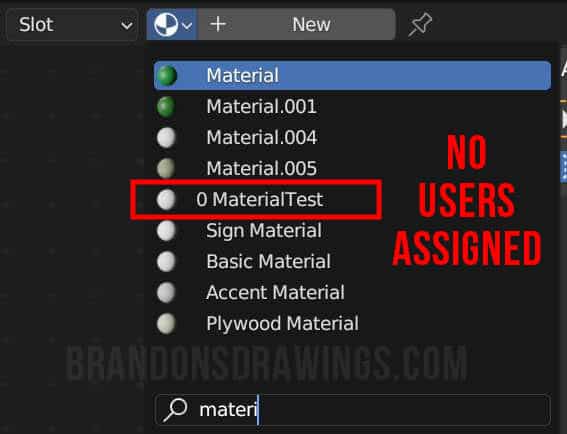
When a data block is not being used in a Blender file at all, it is referred to as “Orphan Data.” If you create a material, but then remove it from all objects, the material is considered orphan data because it has zero assigned users.
In data block menus (materials, objects, scenes, brushes, etc) the number “0” will appear next to a data block with no assigned users. This indicates it is orphan data and will be purged the next time Blender closes.
Yes, that means the data will be deleted!
Blender is again trying to be efficient and not keep data blocks around if they aren’t necessary. But obviously this can cause problems if we aren’t using a data block but still want it saved for future use.
We can view all of the orphan data from the Outliner. This will be coved a few sections down.
Fake Users
If we have a piece of data (a material for example) that we aren’t using right now but still want to save for later, there is a solution. Blender allows us to treat a data block as if it was assigned to a user through a method called “Fake Users.”
It’s a strange and confusing name, I know.
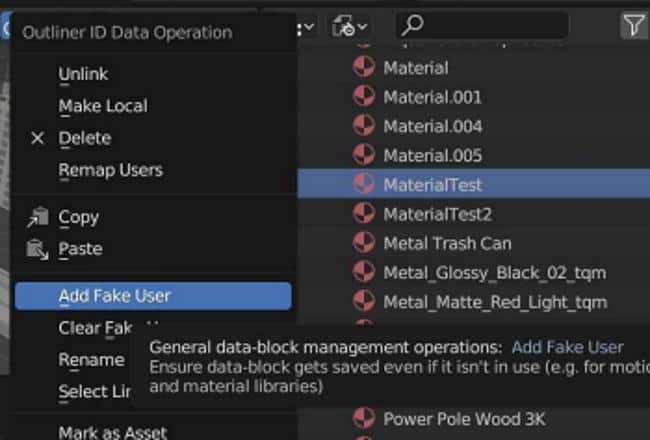
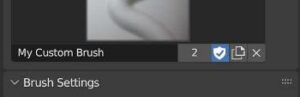
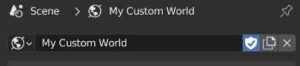
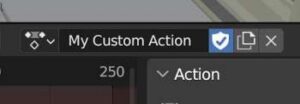
When a data block is selected in a data block menu (materials, brushes, objects, etc) there is a shield icon available on the right. This is the “Fake User” icon.

To assign a fake user to a data block in Blender, press the icon with the shield adjacent to the data block menu. When the icon turns blue, a fake user has been assigned.
An alternative method is to assign fake users from the Outliner. Right click any data block in the Outliner and choose “Add Fake User” from the context menu.
Although I’m using materials as an example, remember this can be done for all types of data blocks. Here are a few more examples:
View & Purge Orphan Data
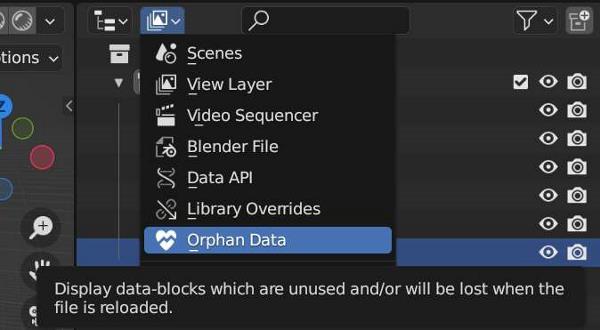
We may want to view all the orphan data in our .Blend file, perhaps to ensure we don’t lose something important before we close the file. We can do this in the Outliner.
In the Outliner, change the display mode from the default “View Layer” to “Orphan Data.”
In the Orphan Data view, all orphan data will be displayed, categorized by data block type. In the below image, we see two orphan materials and two orphan meshes (objects).
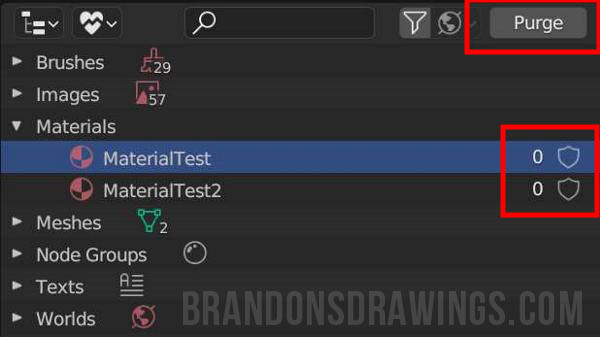
We see the shield icon displayed next to each piece of orphan data. Here we can add a fake user to data we wish to keep in the .blend file. At the top right is a button labeled “Purge.”
This button will purge all orphan data that does not have a fake user assigned. This is how we delete unused data in Blender.
To purge orphan data from a Blender file, go to the Outliner and change the display mode to “Orphan Data.” Press the “Purge” button in the top right of the Outliner.
Clean Up Unused Data-Blocks
An alternative to the above method is to clean up unused data-blocks from the file menu. With this method, we will not be able to see the data blocks or know how many we are purging. It will delete every data block not in use.
To delete all unused data blocks in a Blender file, go to “File” in the top menu. Choose “Clean Up” and then choose “Unused Data Blocks.”
Internal vs External Data
Data blocks are specific types of data Blender stores internally. However, in order to be efficient, many types of data are not stored internally. Most notably, image files are not by default stored (or packed) into Blender.
Blender will save the image file as a data block, but will reference the file externally (somewhere on our computer). This is one reason why Blender files are relatively small compared to other 3D file types. This is also why we can lose an image we edit in Blender if we don’t save it externally.


The external files can become problematic when we wish to share (or sell) the Blender file with another person. If the recipient only gets the Blender file without the external images needed for PBR textures, their textures will be bright pink (because they’re missing data).
Packing Data is a way to bring all external files into a Blender file.
Packing Resources
If we want to bring all external data files used by a Blender file into Blender, we can “pack” the external files. Go to File in the top bar menu. Choose “External Data” and then “Pack Resources.” This will bring in external files.
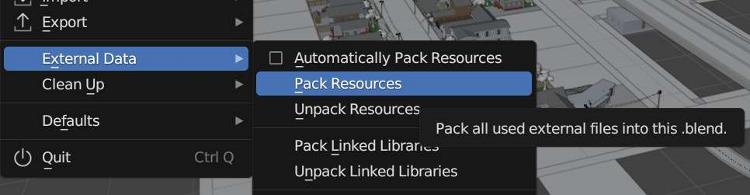
Be warned, packing files inside Blender is not as efficient as referencing external files. It will cause the .Blend file to become much larger.
If we want to automatically have all future external resources packed into our .Blend file, we can go to File – External Data and check the box for “Automatically Pack Resources.” With this checked, every external data we use in the .Blend file will automatically be saved internally.
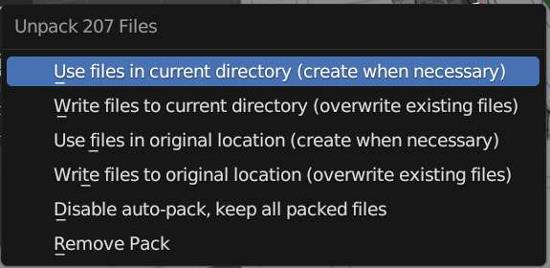
Unpacking Resources
If we receive a Blender file with packed resources, we can unpack the resource files to a place on our computer. Go to “File” in the top menu and under “External Data” choose “Unpack Resources.” A menu with different methods for unpacking will appear.
Here’s a link to the official Blender manual’s documentation on packed data.


Find Missing Files
Sometimes when linking to external resources, Blender can’t find the files it’s looking for. You’ll notice this if you see a material has turned all pink. The pink material indicates one or more external files used in the material is missing.
Files can become missing for three main reasons.
- They have moved to a new location and Blender doesn’t know where to look.
- The external file has been renamed.
- The external file has (unfortunately) been deleted.
If you know where the file is and it has not changed names, you can use Blender’s “Find Missing Files” feature.
To find missing material files in Blender, go to “File” in the top menu. Choose “External Data” and then “Find Missing Files.” Navigate to a directory on your computer where the missing files are located. Press “Find Missing Files.”
Conclusion
Thank you for reading and I hope this helps. Take a look around the site. I have a lot of free resources for Blender users here and on my YouTube channel. Become a member of my growing e-mail list to get Blender news and occasional offers on 3D resources. Stay creative!
Get Brandon’s Newsletter
By submitting, you agree to receive periodic e-mails from me. You can unsubscribe at any time.