
The Wireframe Modifier is a simple modifier and is one of the 54 mesh modifiers I explain on this site. Here’s everything you could possibly want to know about how to use Blender’s wireframe modifier.

Read on or learn how to use the Blender Wireframe Modifier in 34 seconds with this Micro Tip Video.

This page may contain affiliate links which pay me a commission if used to make a purchase. As an Amazon Associate, I earn from qualifying purchases.
The Basics

How to Add a Wireframe Modifier
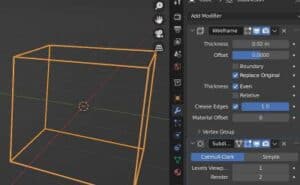
To add a wireframe modifier to an object, select the object while in Object Mode. Go the Modifier Properties Panel located by default on the right side of the layout workspace. Select “Add Modifier” and choose “Wireframe” from the dropdown box. The following modifier panel will be added to the Modifier Stack.


To add a wireframe modifier in Blender, follow these steps:
- Select the object you want to apply the modifier to
- Open the modifier properties panel
- Choose “Add Modifier”
- Select “Wireframe” from the list of modifiers
Wireframe Modifier Settings
By default, you should see the wireframe modifier take effect immediately. If this is the look you want, great! But we will now go over each setting available for the wireframe modifier.


Thickness
The thickness option may be the most self-explanatory. It determines how thick the wireframe of the object will be. The setting is in the unit of measurement set in the Scene Properties Panel. So if you have your scene units set to millimeters, it will display in millimeters, etc.
The thickness of the wireframe modifier can be as large or small as we want to make it. If a negative number is placed in this value, it will invert the direction of the offset (which is the next setting).
Further down in the settings, we will have the option of having the thickness be even and/or relative.


Offset
The offset of the wireframe is the distance it will be generated from the center of each edge. The values range from -1 to 1. A positive value will place the wireframe on the outside of the original mesh.
A negative value will place it inside of the original mesh. A value of zero will center the wireframe on the original edges of the mesh.

Boundary
The base shape of the wireframe is a closed polygon for most edges of the mesh. The edges on the perimeter of the mesh, which do not connect to a plane on each side, can be closed polygons or can be left open.
When the boundary box is checked on, all edges of the wireframe will be fully enclosed. When it is unchecked, the mesh island boundaries will not be enclosed. The differences are demonstrated in the images below.


Replace Original
By default, the “Replace Original” box will be checked and this causes the original faces of the mesh to be replaced with the wireframe. With it checked, no faces will be visible.
We can instead choose to uncheck the box and keep the faces of the original mesh. This can be a desired effect to make the wireframe serve as an outline for the object’s existing geometry. Below is a demonstration of when “Replace Original” is checked and when it is unchecked.


The wireframe itself and the original geometry can be given different materials by using the material offset setting explained below.


Thickness Even
The thickness of the wireframe can be set to “Even” which adjusts for sharp corners according to the official Blender manual. When this setting alone is toggled on and off, a very subtle difference can be seen.
However, the “even” setting is very different than the “relative” setting which is the next option.
Thickness Relative
Below the “even” setting is the option to toggle on and off “relative thickness.” This causes the thickness of the wireframe vary depending on the length of an edge. Longer edges will be thicker when this setting is turned on.

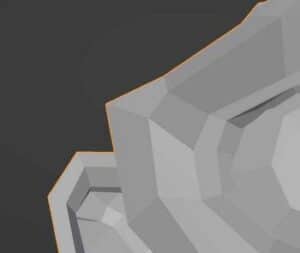
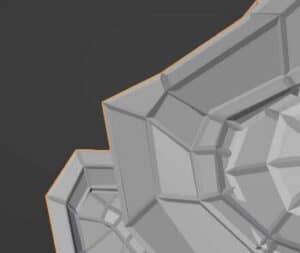
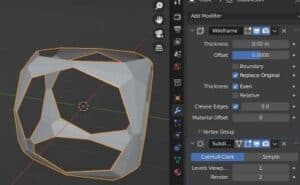
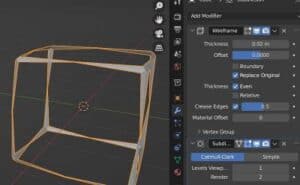
Crease Edges
When using the wireframe modifier, we can also use a Subdivision Surface Modifier and control the edge crease weight with this setting. The result of adjusting this setting will be more or less curving or rounding of edges near corners.
Here’s how adjusting it will look on the default cube with a subdivision surface modifier attached to it.


Material Offset
When using Blender’s wireframe modifier, we can assign a material to the object as we normally would. If we are replacing the original mesh, the material will be assigned uniformly to the wireframe.
If we are not replacing the original mesh, we can choose to have one material assigned to the original mesh and a different material assigned to the wireframe.

Material Offset refers to the material index. We can assign multiple materials to an object and then choose one for the wireframe.
By providing a value in the material offset setting, we are telling Blender to go down the list of assigned materials a certain number of times to find the desired material.
In short, as we increase or decrease the offset value, we will see a different material from assigned slots on the object. Play around with it and it should make sense eventually.
More Resources
Thank You
Thank you for visiting the site. I hope this page was helpful. Please take a look around for more useful tutorials. Also, I have a YouTube channel with video tutorials and you can sign up for my newsletter below. Stay creative!
Get Brandon’s Newsletter
By submitting, you agree to receive periodic e-mails from me. You can unsubscribe at any time.