
The Asset Browser is a tool to quickly add “assets into a Blender scene. Mastering and organizing your asset browser is one of the main ways to speed up our workflow in Blender.

This page may contain affiliate links which pay me a commission if used to make a purchase. As an Amazon Associate, I earn from qualifying purchases.
A technical (but important) aspect of Blender’s Asset Browser is that it’s not a true asset library which stores and imports assets. It is a pointer system that tells Blender where to find assets to bring into our Blender file.
What Are Assets in Blender?
I’ll be using the term “assets” a lot in this guide. Assets refer to items which can be “marked” to appear in the browser.
When I use the term “asset” it could mean:


Setting up the Asset Browser – File Paths
The Asset Browser adds a new editor in the list of Blender editors. The icon looks like books on a shelf.

Before the asset browser will work, we need to do two things:
The library is a location (or several locations) on our computer where Blender can find assets we want in the browser.
The concept of this library can be confusing. There is generally no need to move files or create duplicated .Blend files. When identifying a library location in the preferences, Blender needs a file folder on our computer.
This folder can have as many subfolders as we want.
We may choose a location as large as the “C” drive on our computer. The larger the library folder, the longer Blender could take to search through it.
Something more specific may work better.
To add a library path, we go into the User Preferences and find the tab on the left labeled “File Paths.” Toward the bottom we find “Asset Libraries.”
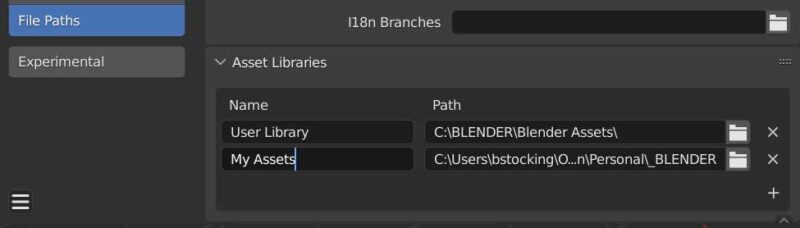
There should be a default library labeled “User Library.” This probably isn’t where we store our assets. We can leave it and add a new one. Or we can change it.
The column on the left is where we name our library. The column on the right is where we give the file path for a folder containing the assets. There’s a plus icon (+) below to can add additional library paths.
If we choose to use only one library, that is fine. We can organize a single library using “catalogs” which are covered later. Or, we may have (for example) one library path for models and another for materials, etc.


How we choose to manage our libraries is entirely up to us. But we will need at least one library with a file path containing .Blend files which contain our desired assets.
The Asset Browser will only look for assets in a .Blend file which is contained inside one of the identified libraries.
Marking Assets in Blender’s Asset Browser
After we’ve set up at least one library (file path) with .Blend files in it, we need to mark individual assets to appear in the browser. Assets won’t be available in the browser unless they are “marked.”
Marking Objects
For objects and collections, right click on them in the Outliner. Then select “Mark as Asset” from the dropdown box.

Marking Materials
To mark a material as an asset, go to the material properties panel and right click the material in the materials list. Then choose “Mark as Asset.”

Once an asset (object, collection, material, etc.) is marked, it will appear in the asset browser. Remember, it will only appear if it is marked from a file which is saved in the file path (or subfolder) identified in the preferences.
Also, to open this asset from another .Blend file, we will need to save this file.
Marking Worlds
Worlds can be marked as assets by going to the world properties settings in the properties panel. Right click the world (HDRI or other settings) and select “Mark as Asset.”

Setting up an HDRI library could be a great use of the Asset Browser. Here is a video introducing how to use HDRIs IN BLENDER.
Marking Actions
Actions are advanced animation tools which save a series of keyframes into actions that can be manipulated in the Non-Linear Animation editor.

By right clicking on the action title in the action editor (found in the dope sheet), we can mark these as assets. They do not generate preview images though.
I have not played around with these very much in the Asset Browser.


Geometry Node Groups in the Asset Browser
Geometry Nodes are one of the most exciting features of Blender right now. Geometry node groups can be marked as assets for the asset browser. I have an entire tutorial dedicated to using the asset browser with geometry nodes.
Current File vs. Library Path
Once we’ve set our file path and marked an asset, go to the Asset Browser (we can open it in any workspace or create a new workspace). We may not see anything in the browser. In the top left, we see a drop-down box which defaults to “Current File.”

The “Current File” refers to the .Blend file we are currently working in. Only assets (which have been marked) in the currently opened file will appear here.
If we marked an asset in this file, we should see it here (if not, try saving the file).
The term “Current File” also refers to an asset’s original file location. We can only make changes to an asset’s assigned catalog if we are in the asset’s “Current File.”
If we marked an asset in a Blender file and went to another file where we wanted to import the asset from the browser, we will NOT see it here in the current file.
Selecting the drop-down box shows the libraries (file paths) we set up in the preferences. We can choose the library which contains the Blender file of the marked asset to see it in the browser.
We can go into any .Blend files stored in our library path and start marking assets for the browser.


Asset Browser Catalogs
Catalogs organize an asset library regardless of where the assets are actually stored or how they are organized on our computer. They are sort of like subfolders but a better comparison is filters.
To assign an asset to a catalog, we need to be in the asset’s “current file” – meaning the original file from which the asset was marked. If we added a lot of assets from a lot of different files, it’s going to take some time to go back and assign them all to catalogs.
The best practice is to establish catalogs we want early and assign assets to our catalogs immediately after we mark them as assets.
Organize assets as soon as you mark them!
Assets can only be assigned to catalogs from the original (“Current”) .Blend file – the one where they were marked as assets. So assign them to catalogs as soon as you mark them!
Let’s make sure we are in a .Blend file from which we marked an asset (aka that asset’s “Current File”). If we change the drop-down box from “Current File” to the correct library, we see the catalogs. Assuming we haven’t set any catalogs up, we should just see the option for “All” and “Unassigned.”
The “Unassigned” area will display any assets not assigned to a catalog. Press the small plus (+) icon at the top of the list to create a new catalog within the selected library.
Give the catalog a name. Now we can go to the “unassigned” assets and drag and drop assets from the browser into the catalog we created.
ALWAYS save your file after marking and assigning assets to catalogs!


Importing Assets from the Asset Browser
Let’s cover how to import them into a scene.
I often use the asset browser to scatter greebles across a scene for added detail.
Importing Objects from the Asset Browser
For objects, it’s as simple as selecting the object by left clicking it in the browser and dragging it into our scene. A box and grid appear in the 3D viewport to visualize where it will appear.

Importing Materials
Materials are given a nice preview image in the browser and can simply be dragged onto an object as well. Not much more to explain on this.

To add a second material to an object from the browser, add a second material slot with the + icon in the material panel.
Drag the second material onto the second empty slot. Then it can be assigned to different parts of the mesh.
Importing Worlds
Background worlds can be imported simply by dragging and dropping a world to anywhere in the scene. This is a great use of the Blender Asset Browser!

I put together a video on my YouTube channel on How to Build an HDRI Library using the Asset Browser.
Importing Actions
Actions are a little advanced, but animators will find this useful.
There are no default thumbnails generated for actions so naming them will be very important.
To import actions, drag them from the Asset Browser onto the dropdown box where an action’s name is displayed in the action editor.

Import Options (Append / Linked)
The asset browser allows us three ways to import an asset into our scene.
At the top of the asset browser is a drop-down box for import options. We can choose three options: Link, Append and Append (Reuse Data).

Import Option: Link
Importing a linked object will directly link the object’s data from its original scene. We initially won’t be able to move or edit the object at all. To do so, we will have to add a library override. Using linked objects allows the object to be managed only from its original file.
This can be useful when multiple people are working on a project. One person could be editing an object in one file and its changes will appear in the linked file.


Import Option: Append
Appending an object into our scene creates a new copy of the object and its data. This object will not be connected to the original file. Each version of the object will also have its own data.
If we imported the same object into our scene twice, we could edit one of them without the changes affecting the other object.
Import Option: Append (Reuse Data)
This option appends the object, which creates a new set of data not connected to the original object’s file. With this option, any subsequent imports of the same object will be linked to each other.
If we imported the same object twice into our scene, editing one of the objects would change the other. The use of data with this method is more efficient rather than duplicating data unnecessarily.
For most cases, this is the option I recommend.
Miscellaneous Asset Browser Features
I can’t call this the “Ultimate” Asset Browser Guide without covering a few other details.
Removing Assets
To remove an asset from the asset browser, we need to be in the file where we originally marked the asset. Find the asset and go to the same place er go to add them (differs by asset type).
Right click the asset and instead of “Mark Asset” we see an option to “Clear Asset.” Clicking this will remove it from the browser but remember to save the file afterwards.
Assets Context Menu
If we right click any asset in the Asset Browser, we get a context menu of options. One of these options is “Open Blend File.”
Choosing this will open the .Blend file where the asset was originally marked (it’s “current file”). This will open in a new instance of Blender so it won’t close the file we are working on.

We can change the display size of the icons in the browser and refresh the asset library to show any recent changes we have made.
Asset Browser Sidebar Menu
While hovering over the Asset Browser, we can press “N” on the keyboard to open a sidebar menu. If we are in a selected asset’s current (original) file, we can edit various parts of the asset’s metadata here.
We can rename the asset. We can add a description, author and tags. We can upload a different preview image.

Notice there is a handy search bar at the top right of the Asset Browser. This allows a search of all our assets by name, description, tag, etc.
Filter Assets by Type
There is a filter icon at the top right of the Asset Browser editor. It allows us to toggle on and off different types of assets to display.

If we had a large selection of different kinds of assets but wanted to only see objects, we could filter it down to only display objects, etc.
Final Thoughts
The asset browser is one of the best ways to improve your workflow in Blender. Optimizing how your browser is organized is the key to better productivity.
I will maintain and update this page as the Asset Browser evolves, so feel free to check back again. Here’s the official documentation from Blender on the asset browser.
Check out my TUTORIALS ON YOUTUBE or subscribe to my newsletter below.
STAY CREATIVE!
Get Brandon’s Newsletter
By submitting, you agree to receive periodic e-mails from me. You can unsubscribe at any time.