The build modifier in Blender is one of Blender’s 54 mesh modifiers. It’s an animation tool that automatically constructs or deconstructs an object over a set amount of time.
It is non-destructive and simple to use.
Read on to learn how to use the Build Modifier in Blender.

This page may contain affiliate links which pay me a commission if used to make a purchase. As an Amazon Associate, I earn from qualifying purchases.
How to Add the Build Modifier in Blender
To use the Build Modifier in Blender, select the object we want to have built (or un-built) and go to the modifiers tab in the Preferences Panel. Press “Add Modifier” and find the “Build” modifier under the generate column.
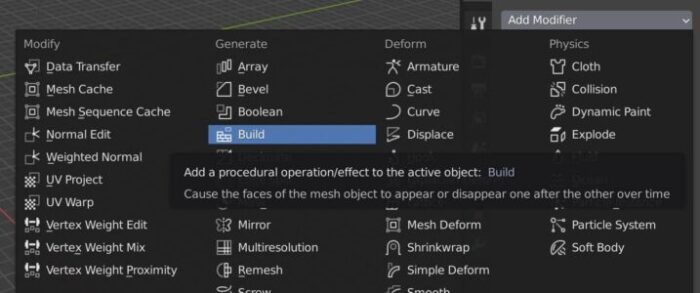
We may notice the object disappear. Don’t panic, it’s supposed to do that. It defaults to building the object (rather than deconstructing it). So if we are on frame #1 of our animation, the object hasn’t been built yet.
The Build Modifier works with the faces of an object. It builds or deconstructs the object face-by-face. So we may need more (or fewer) faces in our geometry to get the effect we are looking for. Too little geometry won’t give Blender much to build with.
Blender Build Modifier Settings
The Build Modifier is fairly simple. There are really only four settings for it.
Start Frame
The start frame is which frame in our animation we want the Build Modifier to start generating (or de-generating) the object. So if we want our object to start being built on frame 50, we type 50 in this box. Simple enough.
Length
The length is how many frames we want the building / deconstructing of the object to take. This isn’t the end frame, it’s the total number of frames for the build.
So if we are starting our animation on frame 50 and leave the default “100” in the length box, it will end on frame 150.
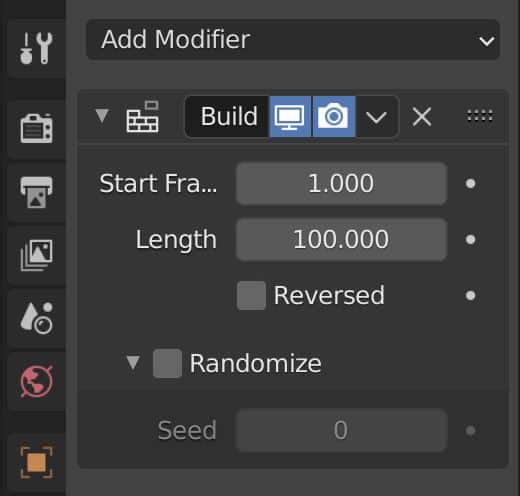
Reversed
Next we have a check box option titled “reversed.” When we check this box, it causes the Build Modifier to deconstruct the object rather than build it. So it’ll start fully constructed and at the end, it will be gone.
Without the box checked, the object will begin unbuilt and end fully constructed.


Randomize
The final check box is to randomize the order in which the Build Modifier animates the construction of the faces of the object. The faces will generate (or de-generate) in a random order. Below the randomize check box is a “seed” option.
Any time we see a “seed” value, it is a way to choose a different randomization. So, if we don’t like the random selection, we can change the seed value until we do. Each value gives us a different randomization.
So that’s really all the options for the Build Modifier, but there is one thing that is commonly asked by Blender users. How do we change the order in which the object is built?
How to Change the Build Modifier Sort Order
Behind the scenes in Blender, every object’s elements are sorted and given an order. So one of the faces is “face #1.” Another is “face #2” and so on.
This hidden list doesn’t usually matter except that the Build Modifier generates an object’s faces in the order they are on this hidden list.
To change the order in which the Build Modifier generates, we have to change the “sort order” of the faces.
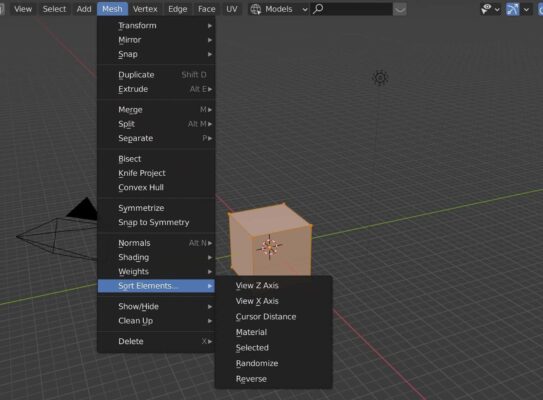
Select the object and press “tab” to go into Edit Mode. Ensure we are on “Face Select Mode” as opposed to Vertex or Edge Select Mode. Press “A” to select all of the faces of the object. Then, go to “Mesh” in the top menu bar.
Go down to “SORT ELEMENTS” and we see options for how to sort the faces of our mesh. They are as follows:
(Once we choose a sort option, go back into object mode and play the animation to see how it works)
View Z Axis
This sorts the faces (based on the current viewport view) from farthest to nearest. We can sort by nearest to farthest by selecting this option and then selecting the “reverse” option below.
View X Axis
This sorts the faces (based on the current viewport view) from left to right. We can select this option and then select “reverse” to sort from right to left.
Cursor Distance
This may be the most useful. Place the cursor somewhere in the scene and choose this option to build the object based on cursor distance. The faces closest to the cursor will build first. The ones farthest away will be built last. Select this and then select “reverse” to do the opposite.


Material
This option will sort the faces by material index. With this option, the materials will be built in the order they appear in the materials panel. We can re-order the materials in the material panels and sort again for a different order.
Selected
This will take whichever faces we have selected and move them to the top of the sort order. This will result in the selected faces being built before the unselected faces.
Randomize
This option randomizes the order of whichever faces we have selected. The reason we would do this rather than use the “randomize” check box in the modifier panel is that we can limit it to the selected faces.
We could select one portion of our mesh, randomize it, and then randomize a different portion of the mesh. Mixing and matching can create interesting build orders.


Reverse
The reverse option reverses the order of any order we currently have for the selected faces.
If you want to visualize the Build Modifier, here’s a detailed video explanation:

Conclusion
Any time we re-sort our mesh’s elements, the previous sort order acts as a tiebreaker or secondary sort order. For example, if we sorted them from top to bottom and then sorted them by material, it’d build the first material from top to bottom and then the second material from top to bottom.
For more, see the Blender Manual’s page about the Build Modifier.
Play around with the order and create some interesting builds. Stay creative!
Author:
Brandon Stocking

Get Brandon’s Newsletter
By submitting, you agree to receive periodic e-mails from me. You can unsubscribe at any time.