
This is a running list of solutions to common issues in Blender 3D. Blender is packed full of settings and it can be frustrating when something isn’t right. This troubleshooting page is where you can find fixes to the most common problems you’ll run into in Blender.
Black Spots in Transparent Areas (Cycles)
If you have a large amount of transparent (alpha) materials in a scene, you may find black areas in your render. This is common when using alpha masked images for leaves, grass, etc.
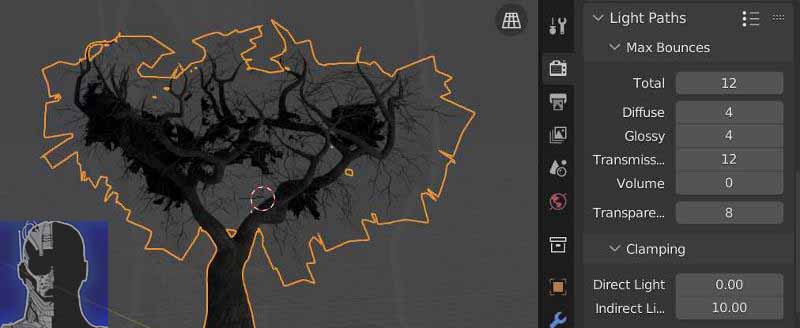
The problem occurs because limits are set on how many transparent materials the camera will see through. This saves memory, but the default setting is very low (eight). To fix this, we need to go to the Render Properties Panel and find the section labeled “Max Bounces” under the “Light Paths” tab.
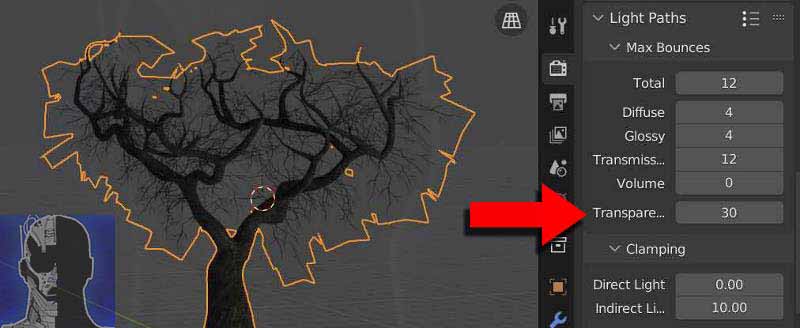
Increase the number for “transparent” to a much higher number until the black areas disappear. This has minimal impact on render times in my experience.
If transparent materials are displaying black spots in Cycles, try this fix:
- Open the Render Properties Panel and expand “Light Paths”
- Expand the “Max Bounces” option
- Increase the number of max bounces for “Transparency” until the problem is solved
Transparency Doesn’t Work in Eevee
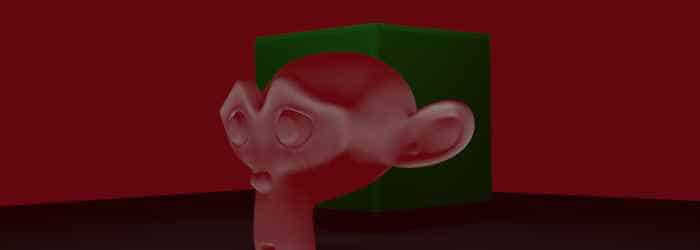
If you are using transparency with a material in Eevee and it doesn’t show as transparent, it’s probably because you missed this important step. In Eevee, transparency doesn’t work with the default settings. In the following image, the Suzanne monkey has a transparent shader applied (but it isn’t working).
To fix this, we have to select the object and go to the Material Properties Panel. Ensure the transparent material is selected and scroll down in the panel until you find “Settings.” Expand the settings tab.

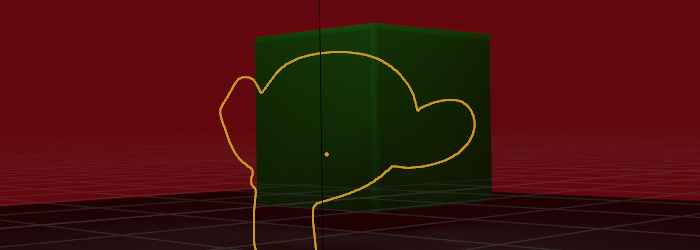
Change the “Blend Mode” for the transparent material from the default “Opaque” to either “Alpha Hashed” or “Alpha Blend.” Either should work. Now the previous image looks like this:
If a transparent material isn’t transparent in Eevee, try this:
- Select the transparent material and open the Material Properties Panel
- Scroll down in the panel and expand the “Setting” tab
- Switch from “Opaque” to either “Alpha Blender” or “Alpha Hashed”
Error: Border Rendering Is Not Supported by Sequencer
When using the Video Sequence Editor, you may go to render the animation and get a pop-up error which says “Border rendering is not supported by sequencer.”

This means in one or more of your workspaces you’ve used the Render Region feature to limit the rendering to a specific area (you used Ctrl + B). To fix this, go through each workspace you may have used and in the 3D viewport areas, press “Alt + Ctrl + B” to remove the render region.
Alternatively, you can turn off the render region from the output properties panel and this will fix the issue.


3D Viewport is Glitchy
This problem becomes more obvious with more complicated and larger scenes. You may find that the viewport is both glitchy and distorted.

This glitchy effect is caused by the viewport clip start setting being too small. Press “N” to open the sidebar if it is not already open. Under the “View” tab, find the clipping settings. Increase the “Clip Start” until the problem is solved.

Materials are Missing and Appear Pink
When Blender can not locate texture images for a material assigned in Blender, it displays the material as pink. This often occurs if we rename or move a PBR texture file that is used in the scene.

To fix the file, we will need to know generally where the file is located on our computer. We could manually re-assign the material or we can instruct Blender to look for it.
To search for missing material files, follow these steps:
- Go to File – External Data – Find Missing Files
- Navigate to a folder on your computer where you believe the missing files are located
- Click “Find Missing Files”

Blender will search the folder and subfolders for files that match the name of the missing files and automatically update them.
If the files have been renamed, you may need to manually replace them in the Shader Editor.
Video Sequence Editor Plays Backward
When we import an image sequence into Blender’s Video Sequence Editor, the images are brought into the editor based on the order they were sorted in the file browser when imported.
For example, in this image the file browser contains an image sequence sorted in reverse order by name. The top image will be the beginning of the image sequence.

Because of the way they are sorted, the image sequence will appear to play backwards. To fix this, we must re-import the sequence and invert the sorting order of the images.

To reverse the direction of playback in Blender’s Video Sequence Editor (VSE), follow these steps:
- Delete the image strip
- Press Shift +A to import the image sequence again
- In the file browser, expand the sorting icon
- Check “Reverse Sorting” and re-import the sequence
Get Brandon’s Newsletter
By submitting, you agree to receive periodic e-mails from me. You can unsubscribe at any time.