
Depth of Field is a photography effect you’ve seen even if you didn’t know you were seeing it. It’s also known as “Background Blur.” It’s the effect that occurs when a camera focuses on objects at a certain distance and and blurs objects that are closer or farther away.
This page may contain affiliate links which pay me a commission if used to make a purchase. As an Amazon Associate, I earn from qualifying purchases.
We can create this powerful artistic effect in Blender using both Eevee and Cycles. It’s all done in the Blender camera settings. Here’s how.

Depth of Field: Camera Aperture Settings
To create Depth of Field (DOF) in Blender, we will need a camera. With the camera selected, we find the Depth of Field settings in the Camera Properties Panel. Below the Lens Settings is a check box to turn on Depth of Field. Expand the section to see more settings.
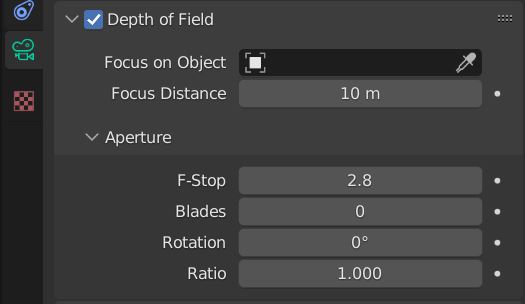
The settings are fairly simple and most of them we don’t need to worry about. The Focus Distance is a distance at which the camera will fully focus. Objects closer or farther away than this distance will be out of focus and blurred.
It can be difficult to know how far away we want the focus to be in distance. This makes the “Focus on Object” setting useful. With this, we select an object to focus on from the drop-down box.
Or we can use the eyedropper tool to select an object to focus on. Choosing the object will automatically align the Depth of Focus distance to the selected object.


F-Stop: Control Depth of Field Blur
By expanding the “Aperture” tab under Depth of Field, we find four settings. The first and most important setting is “F-Stop.” F-Stop is a measurement used in photography.
According to PhotographyLife.com, the F-Stop is “the ratio of the lens focal length to the diameter of the entrance pupil.” What’s important to know about this is what the F-Stop setting does to our image in Blender.
A smaller F-Stop setting will increase the blurry effect of the out-of-focus objects. A larger number will reduce the blurriness. We will only see the effect in Material Preview or Render Preview Modes (not in Solid View) by default. Below is an example of a low F-Stop vs a higher F-Stop.


Aperture Settings: Blades, Rotation and Ratio
Below the F-Stop controls, we see three more settings for “Blades,” “Rotation” and “Ratio.” These are very technical settings to further simulate a real-world camera. I generally haven’t had to use them, but I’ll try to explain them as best I can.
A real-world camera’s aperture is a series of blades which overlap as they rotate to make a roughly circular aperture opening. Real cameras can have different numbers of blades. Blender’s cameras can too.

The term “Bokeh” refers to the quality of the blurry effect caused by a camera’s Depth of Field – especially with lights and reflections. More blades on a camera’s aperture creates a smoother Bokeh effect.
Adjusting only the blades probably won’t make a noticeable effect. Combining a “Blades” adjustment with the “Ratio” setting can more noticeably change the look of the blur.

The “Rotation” setting controls the rotation of the camera’s blades. I’ve played with this a lot and can’t seem to notice any difference when I adjust it. But I’m sure there are smarter people who understand its purpose and when it would be useful.
The “Ratio” changes the distortion effect of the “Bokeh.” It defaults to 1. Lowering the setting will cause a horizontal distortion of the blur. Increasing it above 1 will cause a vertical distortion of the blur.
To learn more about depth of field settings, visit the Blender Manual page on camera depth of field.
Animating Depth of Field
Transitioning the Depth of Field during an animation can create a great effect. DOF in Blender can be animated a few different ways. We can manipulate the Focus Distance by adding keyframes to the slider, but that’s the hard way.
The method which gives us the best control is to add an empty to our scene and place it where we want the focus to begin in the scene. Using the “Focus Object” setting and focus on the empty object.
Even though empty objects don’t appear in our rendered images, they can be used as a focal point for the camera.
Then as we want the Depth of Field to move, we simply animate the movement of the empty object. We can also animate the value of the F-Stop to have the effect fade in or out.


How to Animate the Empty Object
Here’s a full tutorial on animating with keyframes, but for now here’s what you need to know to animate the empty object’s movement.
Go to the frame in the animation timeline when we want the Depth of Field to begin its transition. Select the empty and use the shortcut “I” to add a keyframe. Then immediately press “L” to indicate we want to add the keyframe to the empty’s location.
Next, move to the frame where we want the focus to be fully transitioned. Move the empty to the new area where we want the camera to focus. With the empty object selected, again press “I” to add a keyframe and then “L” to indicate location.
Play the animation and the empty will move (along with the camera’s focus) to the new area where we want it.
Thank You!
I hope this helped explain how to use Depth of Field in Blender. Have a look around the site for more Blender content. I also have a YouTube channel with video tutorials and you can join my e-mail list below for content updates. Stay creative!
Get Brandon’s Newsletter
By submitting, you agree to receive periodic e-mails from me. You can unsubscribe at any time.