
The one thing every 3D scene needs is a camera which controls how the final scene is rendered. Problems with rendering are often caused by camera settings in Blender – and there are plenty of them.
In this post, we are going to cover:
This page may contain affiliate links which pay me a commission if used to make a purchase. As an Amazon Associate, I earn from qualifying purchases.
Camera Basics in Blender 3D
In Blender, cameras are objects. But they are a special type of object and are not visible in renders. Cameras have no material properties and there is no Edit Mode for cameras. The default Blender scene contains one camera but we can add multiple cameras to a scene.

Like other objects, we can move (G), rotate (R) and scale (S) the Blender cameras. What is seen through the active camera is what will be rendered.
To add additional cameras to a scene, we press “Shift+A” in the 3D Viewport and find the object type of “Camera.”
To see what the camera sees we need to be in camera view. The shortcut to enter Camera View is zero (0) on the keyboard’s number pad. When in Camera View, we will see from the camera’s perspective.

An outline (rectangular by default) will display to show the boundary of the camera while in camera view. To exit camera view, press the middle mouse button and move the mouse.
Multiple Cameras in Blender
When we have multiple cameras in Blender, one (and only one) will be the “Active Camera.” The active camera is the camera that will be used to render the 3D scene.
The triangle over the active camera will be black to indicate it is the active camera. The triangles over non-active cameras will be transparent.
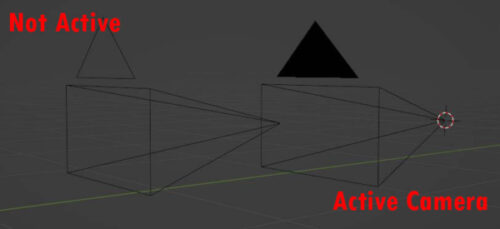
When using multiple cameras, we switch the active camera by selecting the camera we want to make active and then pressing “Control + NumPad0” (Control and the zero on the number pad). This sets the new active camera and brings us into that camera’s view.
Now the new active camera’s triangle has turned black to indicate it is now the active camera.
Also, we can change the Active Camera with the dropdown box in the Scene Properties Panel or by right clicking the new camera and choosing “Set Active Camera” from the menu options.


Like other objects, Blender cameras can be renamed. The fastest way to rename a camera is by selecting it in the 3D Viewport and pressing F2. A small box will appear where we can type in the new name and press “Enter.” This is one of the 50 Tips I cover in this BLENDER TIPS VIDEO.
Locking View to Camera
We have an option to set our camera to the current view in the 3D viewport. We do this with the shortcut “Control + Alt + Numpad 0.”
This immediately moves the camera to our current view which is great for lining up our shot.
We can keep the camera locked to the current view by going into the sidebar (the “N” bar) and checking the box “Camera to View.”


Blender Camera Properties and Settings
A majority of the camera’s settings are found in the Properties Panel. When a camera is selected, a Camera Properties icon will appear in the Properties Menu.
The settings will be slightly different depending on if we are using Eevee or Cycles as our render engine. If we are in Eevee, some of the settings will not be applicable and won’t display.
Camera Lens
The first settings are for the camera lens. There are three lens types; Perspective, Orthographic and Panoramic. Panoramic will only work in Cycles.
Perspective
This is the camera type we will probably use the most. It mimics a real world camera and the human eye because objects farther away will appear smaller than closer objects (hence, “perspective”).


Orthographic
An orthographic camera ignores perspective. Distant objects will appear the same size as close objects. While this isn’t how human eyes work, this can be useful for technical diagrams and there are a lot of abstract effects this can create.


Panoramic
The panoramic camera is only available in Cycles. There are several types of panoramic cameras supported and a sub-type dropdown box will appear when “Panoramic” is selected as the lens type.
Equirectangular cameras capture an entire 360 degree view. These can be used to create 360 degree images. Other types include “Fisheye” and “Mirrorball” which have specific, but rare, uses.


Camera Focal Length
While there is probably a more technical definition of this, the focal length is essentially the zoom of the camera.
Shift
We can shift the lens of the camera along either the X or Y axis. This allows us to make small adjustments to the camera angle without moving the camera.
Camera Clipping
The “Clip Start” and “Clip End” settings are used to give the camera a range in which to display objects in the scene. The camera will not see objects infinitely far away and it’s also problematic to display objects that are too close to the camera.
Any objects farther away than the “clip end” or closer than the “clip start” distances will not be displayed in the camera’s view. or final render If we are not seeing objects in a scene, we may need to increase the “clip end” distance.
Avoid setting the “clip start” too small as it will cause glitching in the scene.
Camera Sensor Setting
The sensor settings and size are advanced settings that perhaps a photographer could explain better. The sensor size can create the same zoom effect as the focal length setting.
Safe Areas
We generally don’t want important objects in our scene to be too close to the edge of the camera’s view. We can set safe areas for our camera that will display dotted lines while in Camera View.

These are just guides to help keep the important parts of our scene from being too close to the edge of the view of the camera. These lines will not be visible in the final render.


Background Images
We can turn on the background image setting and display either a background image or video in our scene.
The background image locks to the camera’s view. We can either place the image behind objects in our scene or in front of them and adjust the opacity.
Viewport Display
Under Viewport Display, we can adjust the size of the camera but this has no functional impact on the camera (just how big it appears in the 3D scene). We can also activate several display options.

Limits
Limits displays a visual line emitting from the camera which represents the clipping start and end distances. This can help us visualize if objects will be too far (or to close) to be visible by the camera.
Mist
Mist displays similar to the limits but will represent the mist start and stop distances. Mist is a tool in the render pass settings to mimic fog effects during compositing.
Passepartout
This controls the transparency of the area outside the view of the camera when in Camera View. Turning this setting to one will make everything outside of the camera view turn black.
Turning it to zero will make everything fully visible. I’ve found it helpful to leave this setting somewhere in the middle so we can easily identify what is and isn’t in the camera’s view.
Composition Guides
Similar to the “Safe Areas” we can view composition guides from Camera View. These don’t display in the final render but give us visual queues for composing our scene – such as the “Rule of Thirds.”
Depth of Field
Depth of Field describes the distance at which objects in a camera’s view are in focus. Even if you didn’t know what it was called, you’ve most likely seen depth of field before in photos or film.
Depth of field is when an object or character is in focus but objects in the foreground and/or background are blurry. Blender creates this effect when depth of field is turned on.
I also have a more thorough post on how to add depth of field in Blender.


Focus Distance / Object
We need to tell the camera how far away the “Depth of Field” should focus. We do this by setting a focus distance or by choosing an object to focus on. Then use the “Focus Object” dropdown box or the eyedrop selector to choose an object for the camera’s focus. Objects closer and farther than the focus object will be out of focus and blurred.
Aperture / F-Stop
The F-Stop setting is what determines how blurry the out-of-focus objects are. F-Stop is a measurement in photography that essentially measures how blurry the out-of-focus objects are. The lower the F-Stop setting, the more blurred the out-of-focus objects will be.
Blender Camera Resolution Settings
There are of course more settings and an important one is the resolution. Resolution settings are universal for all cameras in a Blender scene. They are located in the Output Properties settings.
Resolution:
The default resolution of 1920×1080 is the standard high-definition horizontal video resolution. It’s very common but of course depending on what we are using our image or video for, we may want to change it.
Here’s another article for learning more about how to change the resolution for renders.
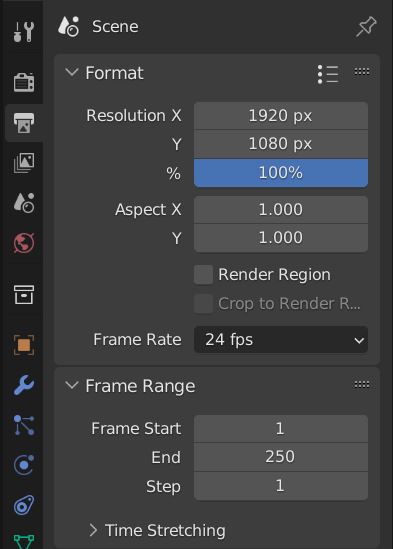
Frame Settings
Frame settings for for animations. We can begin an animation at a specified start frame and end it at the end frame. The frame rate is how many frames per second will be in the animation.
The step is how many frames will be rendered. With a step of “1” every step will be rendered. A step of “2” will render every second frame only (and so on).


Walk/Fly Camera Navigation
An interesting thing we can do with or without our camera is to view our scene in Walk or Fly mode. Here’s a quick tip video on walk/fly navigation:
To carefully move and adjust the camera view in Blender, we use walk mode. In walk mode, we can move the view of the camera in any direction and move the camera itself with WASD. To enter walk mode, press “Shift + ~” (that’s the accent at the top left of the keyboard).
We can navigate our scene using “W,” “A,” “S” and “D” like in video games. “E” takes us up vertically and “Q” brings us down. We can point our cursor to look around.
The reason I’m mentioning Walk Mode in a camera tutorial is that when we are in Camera View (Control + NumPad 0) we can use this to fine-tune our camera positioning.
We can change to “Fly Mode” under Navigation in the Preferences which works a little differently.


Common Camera Questions
I’ve consolidated some of the more common questions I’ve seen about cameras in Blender here.
How to move the camera in Blender?
To move the camera in Blender, select it in the viewport and press the keyboard shortcut “G.” Use your mouse to position the camera and left click when finished.
Of course, this may not be as precise as you want. See the above walk and fly mode sections for a more natural way of moving the camera.
Final Thoughts
Blender cameras aren’t the most exciting topic, but a camera is one thing every scene will need. They can also be frustrating. If your render doesn’t look right, there’s a good chance you need to change a camera setting.
Here’s the official documentation on cameras from the Blender manual.
I hope this was helpful. Take a look around the site. I have a growing number of resources here and on my YouTube channel. Consider joining my newsletter below for ocassional news, updates and products related to Blender and 3D art.
Get Brandon’s Newsletter
By submitting, you agree to receive periodic e-mails from me. You can unsubscribe at any time.