
In Blender, Shape Keys are tools to morph a mesh from one shape to another. Each object is assigned a basis shape and can then have many shape keys to which it can morph.
This page may contain affiliate links which pay me a commission if used to make a purchase. As an Amazon Associate, I earn from qualifying purchases.
Shape keys are often used for facial animations and muscles but can have many uses in animation. Here’s everything you need to know about shape keys in Blender.

What are Shape Keys Used For
Imagine a human face. Rather than rigging the entire face to give the face different expressions, we can establish pre-set shapes to have the face morph into. These are shape keys.

Above, the strength of the shape key is being adjusted in the shape keys panel found in the data properties. It slides from a value of zero (the base face) to one (the smiling face). This value can be animated with key frames.


How to Add Shape Keys in Blender
We can add shape keys to mesh objects. Before we add shape keys, there are a couple of things we need to be aware of:
With an object selected, we find the shape keys panel in the object data properties. We will use a simple example of a UV sphere morphing into a raindrop to demonstrate.

Adding Shape Keys
While in object mode, we press the plus (+) icon in the shape keys panel to add our first shape key to the selected UV sphere. This will default with the name “Basis” and will represent our base shape.

Next we add a second shape key. The second shape key will have the default name “Key1.” This will be our first non-basis shape key. Shape keys can be renamed by double-clicking on them in the shape keys panel.

With the first non-basis shape key added, we can press “tab” in the 3D Viewport to enter Edit Mode. We are now about to change the mesh into the morphed raindrop shape we want.
Important: Whichever shape key is highlighted is the one that will be edited. We don’t want to edit the basis shape key!
For demonstration, I will turn on Proportional Editing and change the sphere into a raindrop shape with Key 1 selected.

Important: Both the basis shape and any other shape keys will need to have the same amount of vertices. They will also need to be connected in the same configuration. Move the vertices to edit the morphed shape, but don’t add any new geometry.
Morphing Between Shape Keys
Once we’ve created the morphed shape, we can press “Tab” to go back into object mode. The object will return to its original shape (this is normal).
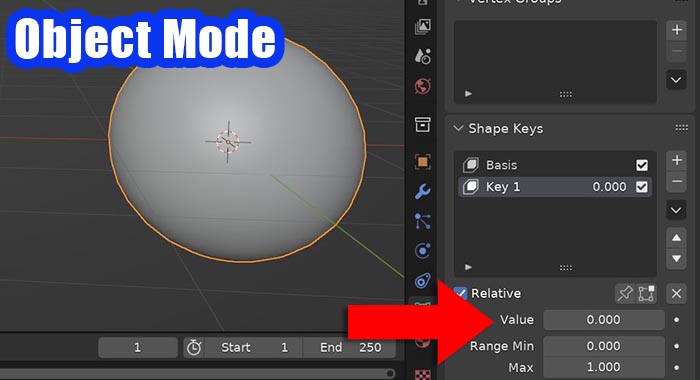
Notice the “Value” setting below the shape key panel. It was previously greyed out. In object mode, it is now active. This is how we morph between the “Basis” shape and another selected shape key.
With the value at zero, the object will be 100% in its original shape. With the value slider moved to “1.000” it will be morphed 100% into the Key 1 shape. We can also partially morph it to a value in between. Or we can type in a value above 1 to extend it farther.

We can add more shape keys to the object by pressing the + icon again. We can morph between different values of different shape keys to get combinations of shapes.
Sculpting Shape Keys
We can also change the shape of shape keys by sculpting. This is useful for facial features and more complicated meshes where sculpting is desired.
When sculpting, the value slider for the selected shape key needs to be slid all the way to “1” or the sculpting won’t be visible. This may be a bug in Blender.


How to Animate Shape Keys in Blender
The value of the shape key can be animated with Key Frames. Go to the frame where we want the transformation to begin. Hover over the value slider and press “I” on the keyboard.

The value turns yellow to indicate a key frame is active on the current frame. Go to the frame where we want the animation to end. Here we will change the value to what we want it to be and add another key frame.

While this isn’t a tutorial on keyframes animation, we can now play our animation and the morphing of the object will be animated.
Final Thoughts
Shape keys are a powerful tool for animation in Blender and there are an endless number of creative uses for them. Play around with them and you’ll find they are the answer to a lot of “how can I animate this” questions.
For more on Shape Keys, here is the official documentation from Blender.
Please take a look around the site for more quick tutorials and guides on Blender. I have a YouTube channel with video tutorials and an e-mail list to keep in touch about major Blender updates and new content. Stay creative!
Check out my popular guide to all 54 Blender mesh modifiers!
Get Brandon’s Newsletter
By submitting, you agree to receive periodic e-mails from me. You can unsubscribe at any time.