
A flickering light in an animated scene can give off a creepy vibe. This is one of many quick Blender tips from the Blender Secrets E-Book – which I highly recommend.
To animate a flickering light in Blender, we place a keyframe on the light’s power and then add a noise modifier in the graph editor. Here’s how to make a light flicker in Blender 3D.
This page may contain affiliate links which pay me a commission if used to make a purchase. As an Amazon Associate, I earn from qualifying purchases.
Step 1: Add a Light you Want to Have Flicker
This trick will work with any type of lamp and even with emissive materials placed on objects. Here’s a full tutorial on the different kinds of lights in Blender. It will work in Eevee and Cycles render engines.

As an example, I will add a single point lamp to a scene and we will walk through the steps to make it flicker. If you want to have several lights flicker together, make sure the lights are linked duplicates of each other.
Step 2: Add a Keyframe to the Lamp’s Power
The lamp will need a beginning power value. In the light properties panel, give it a base value. It really doesn’t matter what the base value is and you can even use “zero.”

Hover the mouse over the power setting slider and press “i” on the keyboard. This will insert a keyframe on the value. It doesn’t matter which frame of our animation we are on and this is the only keyframe we will need to add.
Step 3: Open Graph Editor
We will need a place in our workspace to add a graph editor. The graph editor is one of the animation editors (an editor is a “screen” in Blender). I will drag the timeline up and change it to a graph editor.

Step 4: Add Noise Modifier
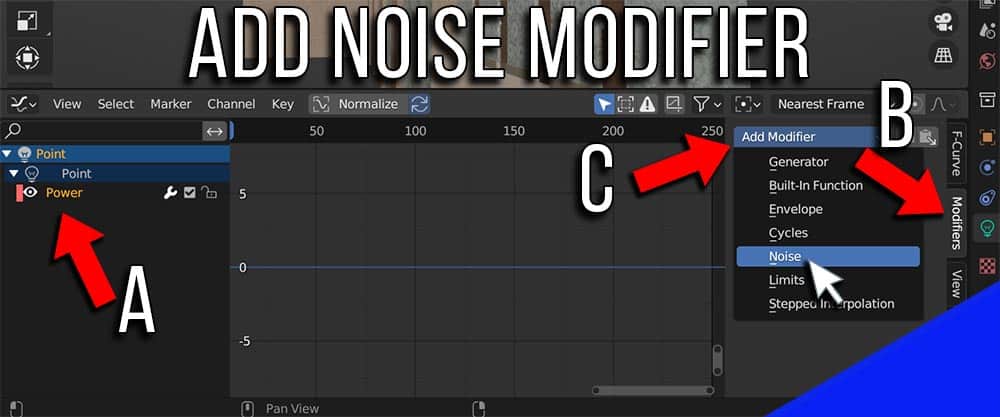
In the Graph Editor, do the following:
A. Click the light in the menu on the left and expand it out until you have the “Power setting selected.
B. While hovering in the graph editor, press “N” on the keyboard to open a sidebar menu. Select the “Modifiers” tab on the sidebar.
C. Click “Add Modifier” and choose “Noise”
By default, the newly added noise modifier should look like this:

We need to make some adjustments using the noise modifier’s controls on the right. These adjustments are based on personal preference. You may want more or less of each setting than is demonstrated, but I’ll explain what each one does.
Strength Setting
The strength setting makes affects how far up and down the values of the noise modifier deviate from the baseline. Higher strength values will cause more dramatic increases and decreases in the change of a value. We will want to increase the strength of the noise modifier.

Scale Setting
The scale spreads the noise out horizontally along the graph editor. Increasing it will make the “jumpiness” of the noise more spread out over time and therefore less abrupt. We will probably want to increase the scale for our flickering light animation.

Step 5: Add Limits Modifier
If you look at flickering lights, they are really go from being fully on to fully off (not somewhere in the middle). We can simulate this with adding a limits modifier.
Again select the “Add Modifier” dropdown and this time choose “Limits.” The Limits Modifier in Blender lets us add upper and lower limits to the animation graph both horizontally and vertically.
With my example, I’ll choose zero for the Minimum Y and 25 for the Maximum Y. This will have the flickering light bounce between a maximum strength of 25 and a minimum of zero.

The End Result: A Flickering Lamp in Blender
You may need to play with the settings to get them just as you want, but we’ve covered all the steps you’ll need to take to add a flickering lamp in Blender. Render it out and make your Blender scene just a little creepier.
Here’s the result of a quick animation using the settings I walked through above. The scene was quickly thrown together, but notice the randomness and sharpness of the flickering:
Conclusion
Thank you so much for reaching the end. I have tried to make this site a free resource for Blender users. I also have a YouTube channel where I’d love to see you as a subscriber. And the most value you may get is from joining my e-mail list below. Thank you again and stay creative!
Get Brandon’s Newsletter
By submitting, you agree to receive periodic e-mails from me. You can unsubscribe at any time.