One of the first and most basic things you probably want to do when learning Blender is to move an object. If you’re looking to animate an object, see the beginner’s guide to animation in Blender. This tutorial is a quick overview of the basics for how to move objects in Blender 3D.
This page may contain affiliate links which pay me a commission if used to make a purchase. As an Amazon Associate, I earn from qualifying purchases.
Basic Movement of Objects in Blender
Before we can move an object, it has to be selected. The simplest way to select an object is to left click it. A yellow outline will appear around the object to indicate it is selected. I have a full article for more on how to select objects in Blender.
When an object is selected, we can move it with the keyboard shortcut “G” and then move the mouse around. The object will continue moving until we left click or press enter on the keyboard to lock in the movement.
I cover more advanced movement techniques below and have a guide to Blender keyboard shortcuts for reference as well.
Moving in Object Mode vs. Edit Mode
If you’re new to Blender, it’s important to point out the difference between Object Mode and Edit Mode. In Object Mode we select objects and move them around our scene.
With an object selected in Blender, pressing “tab” on the keyboard will enter Edit Mode. In Edit Mode, we can move geometry to reshape the object.
Both are ways of “moving” things in Blender, but this tutorial is focused on moving objects while in Blender’s Object Mode.
Move Objects with the Move Tool in Blender
Another method of moving objects is with the Move Tool. We access the move tool from the toolbar which appears on the left side of the Blender viewport.
If you don’t see the toolbar on the left of the viewport, press “T” on the keyboard to toggle it open and closed.
The move tool’s icon is four arrows pointing in different directions. Left click the move tool to activate it.
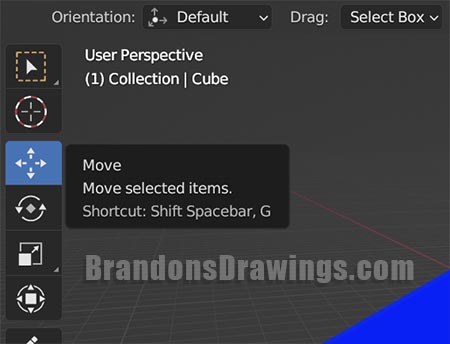
With the move tool activated, a “gizmo” will will appear around the selected object. The gizmo includes a red, green and blue arrow pointing in different directions.
The red arrow shows the direction of the X axis. The green arrow shows the Y axis and the blue arrow shows the Z axis (up and down).
Left clicking and holding on any of the arrows allows us to slide the selected object either direction along that axis (and only that axis).
Releasing the left mouse button locks the movement in place.
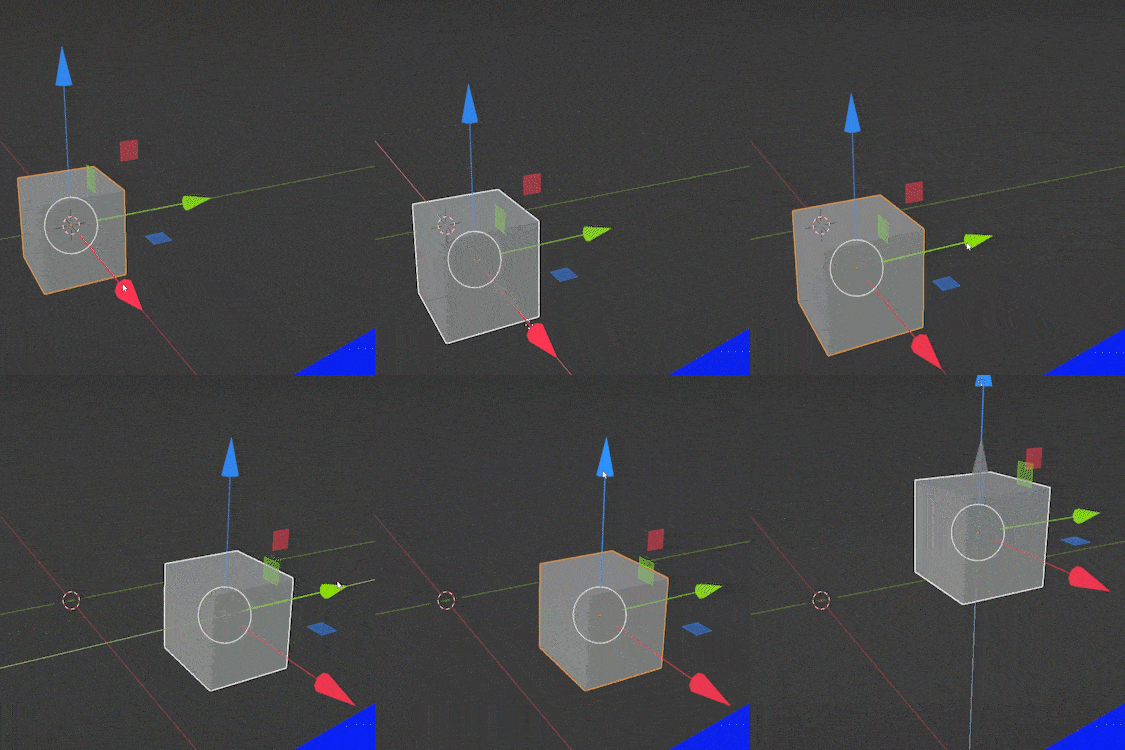
Using the three arrows, we can move an object anywhere in Blender. But there are faster ways (including the shortcut “G” mentioned above). We’ll cover some other methods next.
Restrict Movement to One Axis with Keyboard Shortcuts
Let’s go back to the faster way of moving an object and that’s using the keyboard shortcut “G.” G stands for “grab” by the way.
Notice when we select an object and press “G” to move it, the movement occurs based on our current view. We can restrict movement along any single axis by pressing the letters X, Y or Z after we press “G.”
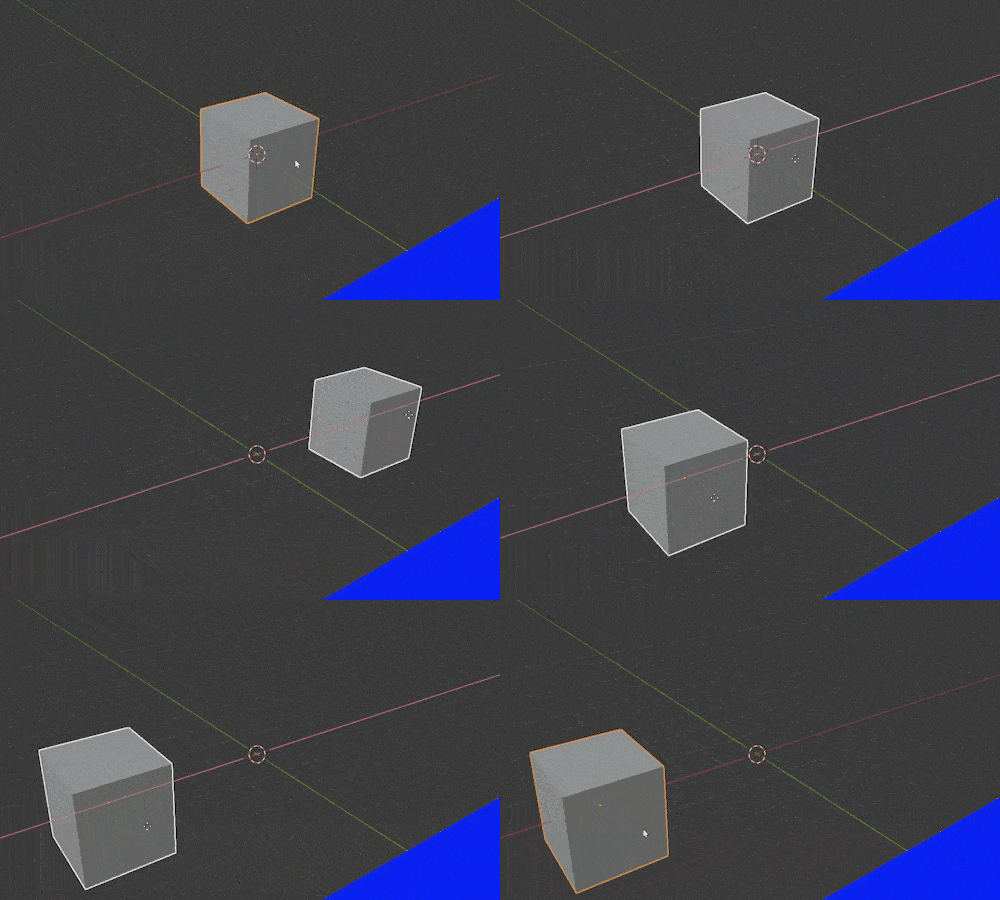
For example, pressing “GX” will let us slide the object back and forth along the X axis. Pressing “GY” will let us move just along the Y axis and the same of course with “GZ” for the Z axis.
We will be able to slide the object back and forth along our selected axis until we left click or press “Enter” on the keyboard to lock in the movement. We may cancel the movement any time before we confirm it by pressing “Escape” on the keyboard or by right clicking on the mouse.
Restrict Movement to Local Axis
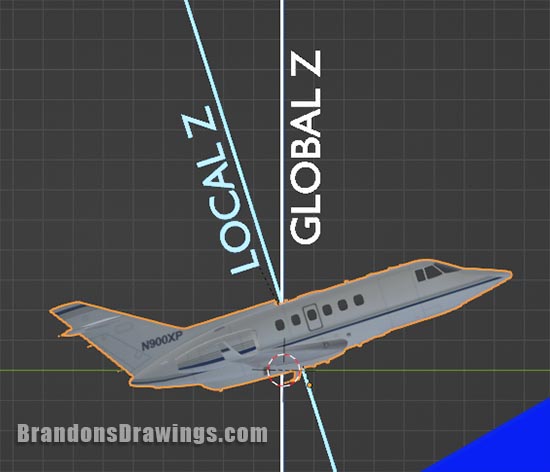
We can restrict an object’s movement to a single “Local Axis” instead of a “Global Axis.” Here’s more about the local and global axis.
To restrict an object’s movement to a single local axis, select the object in object mode. Pres “G” on the keyboard and then press the letter of the axis twice. So we would press “G + XX” to restrict movement along the local X axis.
Restrict Movement to Two Axes with Keyboard Shortcuts
Imagine we have an object sitting on a floor. We want to move the object around on the floor but don’t want to lift it off the floor. In 3D space, that means we want to move it freely along the X and Y axis but don’t want the object to move on the Z axis.
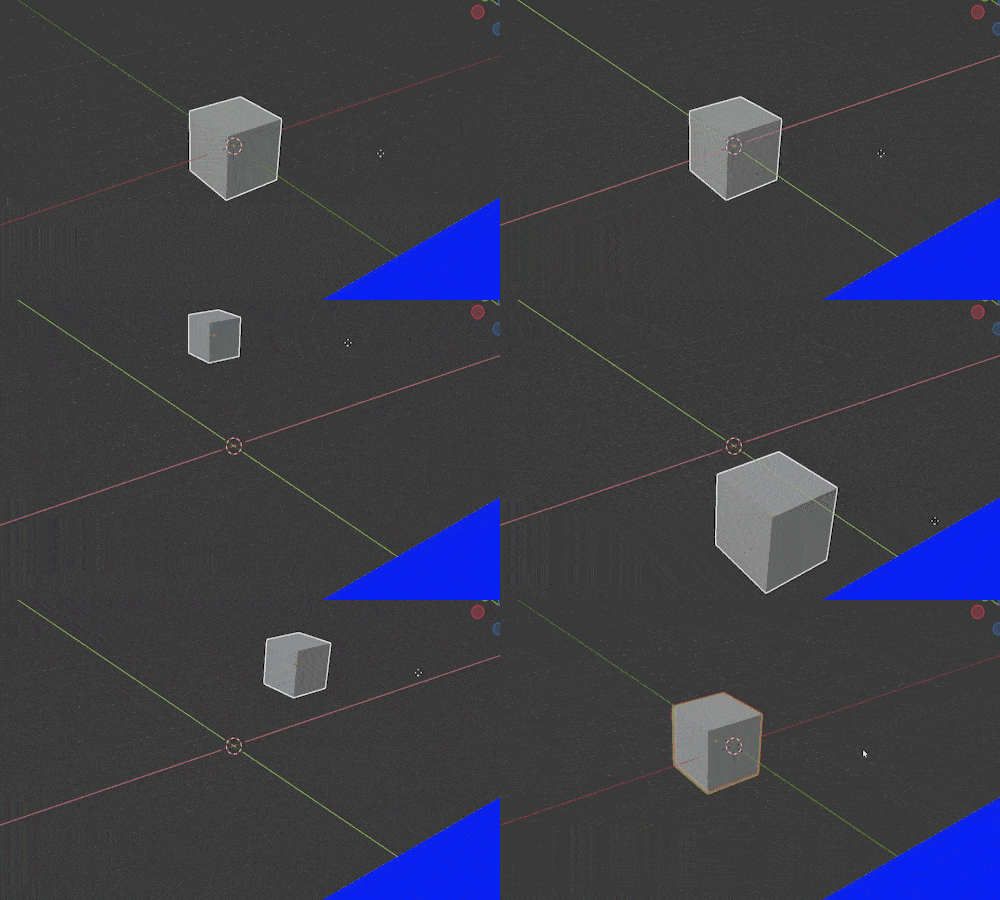
In Blender we restrict movement to all but one axis by pressing “G” to move and then “Shift” and the letter of the axis we DON’T want it to move along.
In the above example, we would press “G SHIFT+Z” to move the object along the X and Y axes but not the Z axis. Then we move our mouse and the object will move freely with our mouse along only the X and Y axis.
We again must left click or press Enter to confirm the movement and we can press Escape or right click to cancel it.
Move Object a Set Distance Along Axis
So far none of the movement we’ve discussed has been very precise. It’s just following the direction of our mouse. We often want to move an object a set distance along a single axis.
To move an object a set distance along a single axis, press “G” to move and then the letter of the axis (X, Y or Z) and then the number of units we want to move. Left click or press Enter to lock the movement.
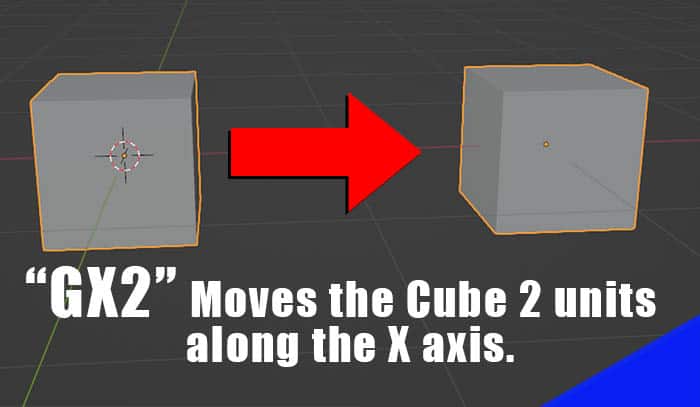
For example, try pressing “GZ2” and the selected object will move two units up on the Z axis. Left click or press Enter to confirm the movement.
Units of measurement (feet, meters, etc) in Blender are set in the Scene Properties Panel. I have another tutorial all about units of measurement in Blender.
Moving Objects in the Negative Direction
Each axis (X, Y and Z) in 3D space has a positive and negative direction. Using the Z axis as an example, the positive direction is up and the negative direction is down. In the above example, we pressed “GZ2” to move the object up by two units.
To move an object in the negative direction along an axis, press the minus key before or after the number. For example, pressing “GZ-2” will move the selected object down by two of our chosen units of measurement. “GY-250” will move the selected object negative 250 units along the Y axis.
Movement by Partial Units of Distance
Let’s say we wanted to move the object in the above example up or down by one and a half units instead of two. We type the units in decimal form. To move the object up 1.5 units, press “GZ1.5” and to move it down, press “GZ-1.5” on the keyboard. Again, press “Enter” or left click to complete the movement.
Combining Keyboard Shortcuts to Move Objects
All of the above mentioned shortcuts for moving objects in Blender can be combined into a single command. The order in which we enter the command does not matter as long as “G” is the first part of the command and left clicking or pressing Enter is at the end of the command.
Here are some examples…
If we want to move the selected object along the X axis by 3 units, we can press “GX3” and then left click or press Enter to confirm. We could also press “G3X” and get the same result.
We could press “GY-5” to move the object five units in the negative direction along the Y axis. We could also press “G5-” and get the same result. Or we could press “G-Y5.” The order of the commands are interchangeable.
Moving Objects to Specific Points in Blender
Beyond simply moving objects along an axis in Blender, we can send an object to specific places in our 3D scene. The most common are covered below:
Move Selected Object to 3D Cursor
The 3D cursor is the red and white circle we see in a scene. The 3D cursor has many purposes and serves as a reference point in 3D space. The quickest way to move the 3D cursor is to hold Shift and right click on the mouse in the 3D Viewport. This will move the 3D cursor to where the mouse cursor is hovering.
There are other ways to move the 3D cursor but the important part for this lesson is we can then move a selected object to the location of the 3D cursor.
To move selected objects to the location of the 3D cursor in Blender, press Shift +S and a pie menu will open on our screen.
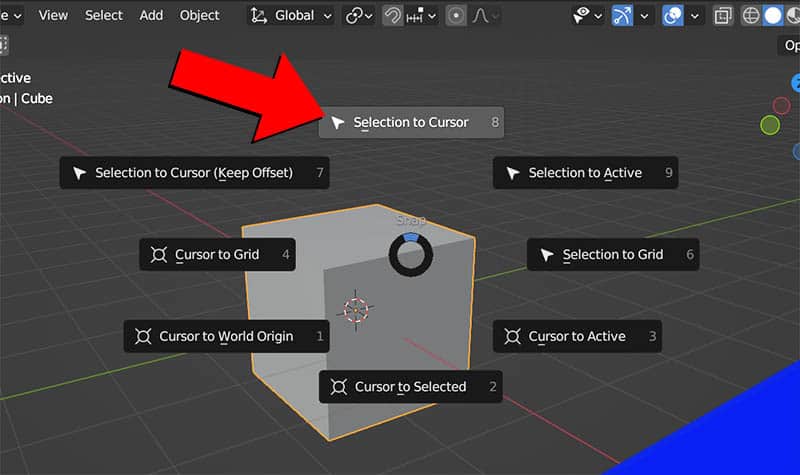
From the pie menu options, choose “Selection to Cursor” or press 8 on the keyboard (notice the numbers next to each pie menu option). Whatever objects are selected will be moved to the 3D cursor’s location.
It’s important to note that the object’s origin point is what will be aligned to the 3D cursor’s location. Every object has an origin point which displays as a small orange dot (generally near the center of the object). I have an entire lesson on origin points of objects in Blender if you’d like a better explanation.
Moving Objects to Other Points
Using the options in the pie menu when we press “Shift S,” there are other places we can send the selected object. Sometimes this requires a two step process of moving the 3D cursor first and then moving the object to the 3D cursor.
For example, if we want to send the object back to the center of the 3D world (known as the world origin), there is no direct option to do this.
To move a selected object to the world origin, we first press “Shift S” and choose “Cursor to World Origin” to reset the 3D cursor’s location. Then we press “Shift S” and choose “Selection to Cursor.” The selected object will move to the world origin.
Animating the Movement of Objects
I realize that if you found this article by searching for “how to move objects in Blender” you may mean “How to animate objects in Blender?” The simplest form of animation is moving an object over time. In Blender, this is primarily done with keyframe animation.
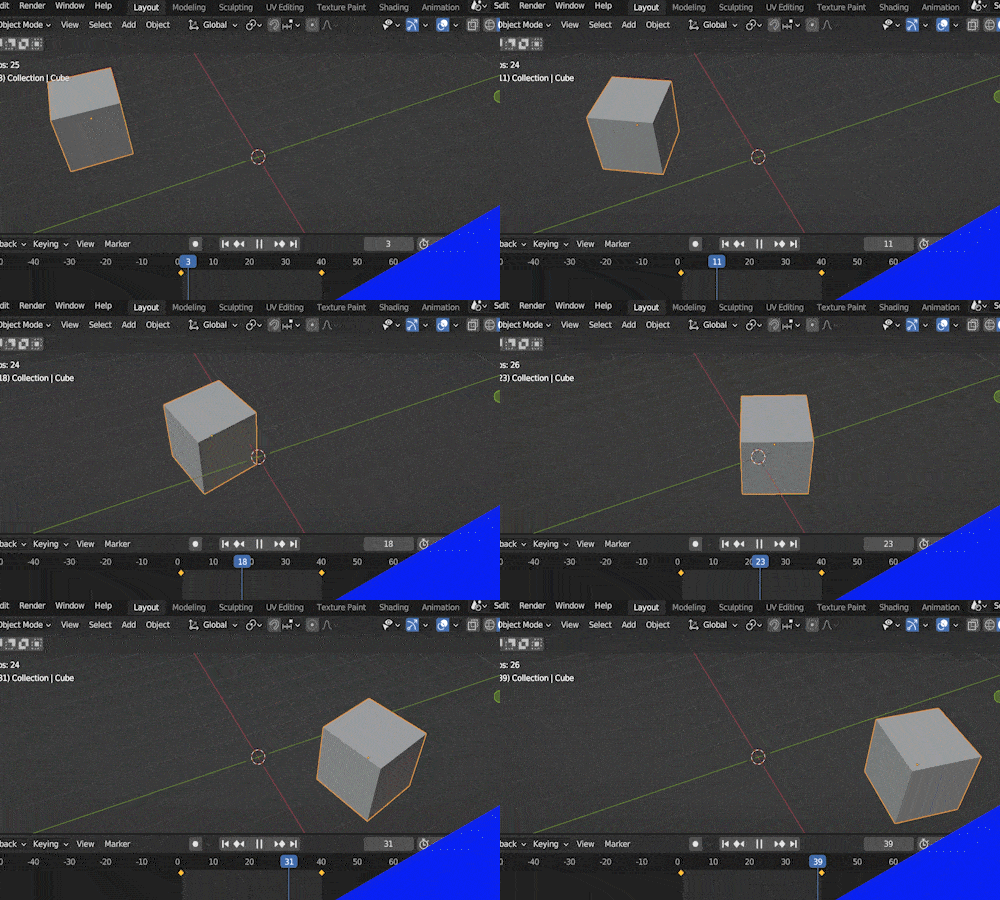
Keyframe animation works is like this: We place our object in a starting location at a certain frame in our animation and we mark that frame as a “key frame.”
Then we move to a future frame in our Timeline Editor. We move the object to the location we want it to end at and insert a second key frame. Blender will animate the movement between the two locations over the number of frames between the two keyframes.
Animation is a major reason to use Blender and I have an introduction to animation in Blender that should help you get started.
Conclusion
Moving objects in Blender is one of the first things you’ll want to learn when you start using the 3D software. The most efficient way to move objects and do most other things in Blender is by learning the keyboard shortcuts.
If you’re new to Blender, I hope you find this site to be a great (free) resource for learning Blender 3D. I recommend starting with the basics of navigation and the user interface and explore from there.
I also have some very beginner-friendly Blender tutorials on YouTube to help. Thank you for reading and stay creative!
Get Brandon’s Newsletter
By submitting, you agree to receive periodic e-mails from me. You can unsubscribe at any time.


